Spring 5
Spring 5
提示
Spring 项目创建
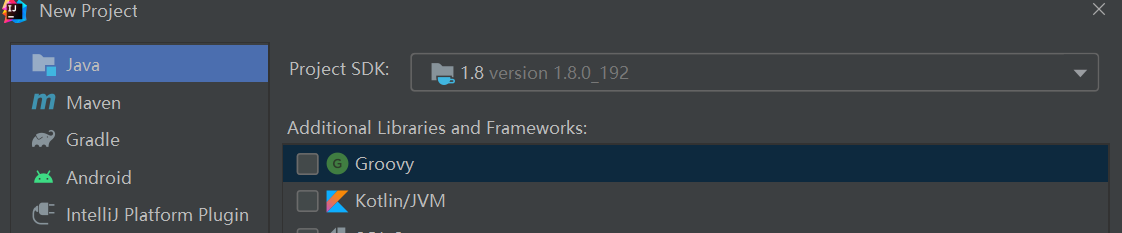
- 创建新项目,选择 JDK1.8 版本
- 勾选项目模板

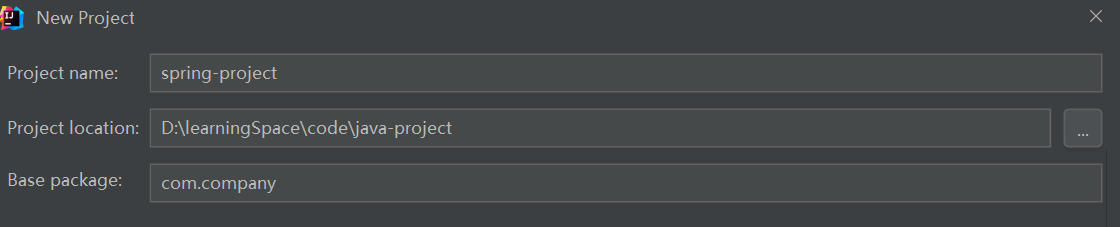
- 填写项目名,选择存储路径,点击完成,即可创建项目
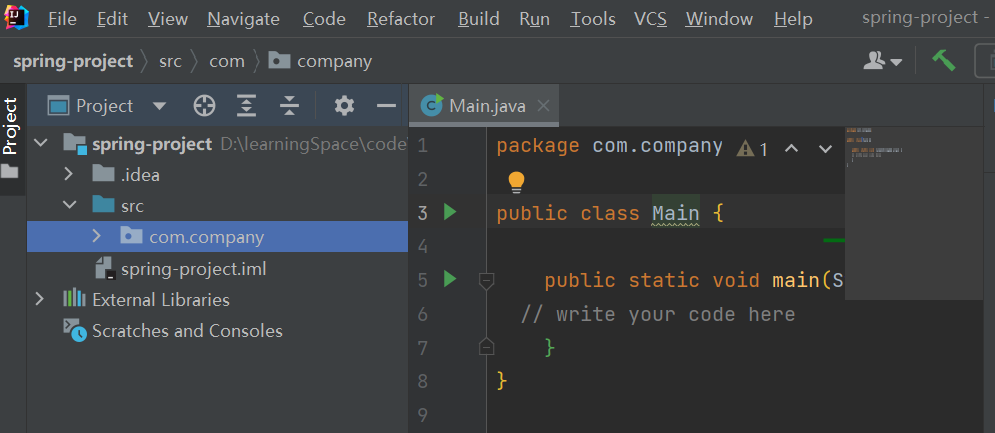
- 创建成功
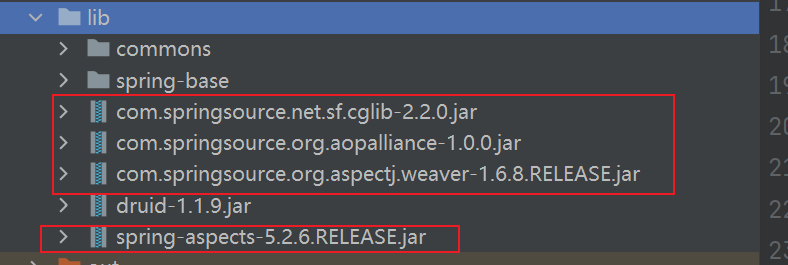
导入 Spring 相关 jar 包

image-20220528162202471 在项目根目录创建 lib 文件夹,放入日志 jar 包和 spring jar 包
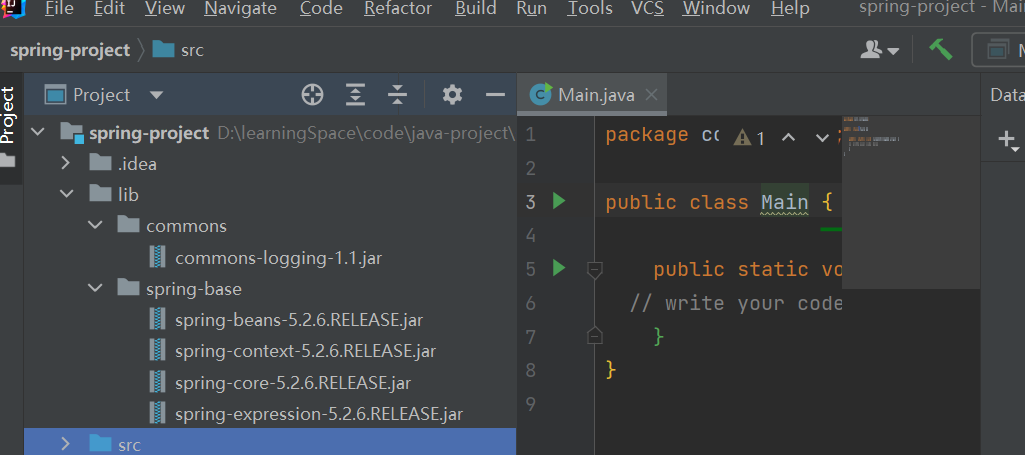
image-20220527103627074 选择 File->Project Structure 添加 jar 包到项目点击应用
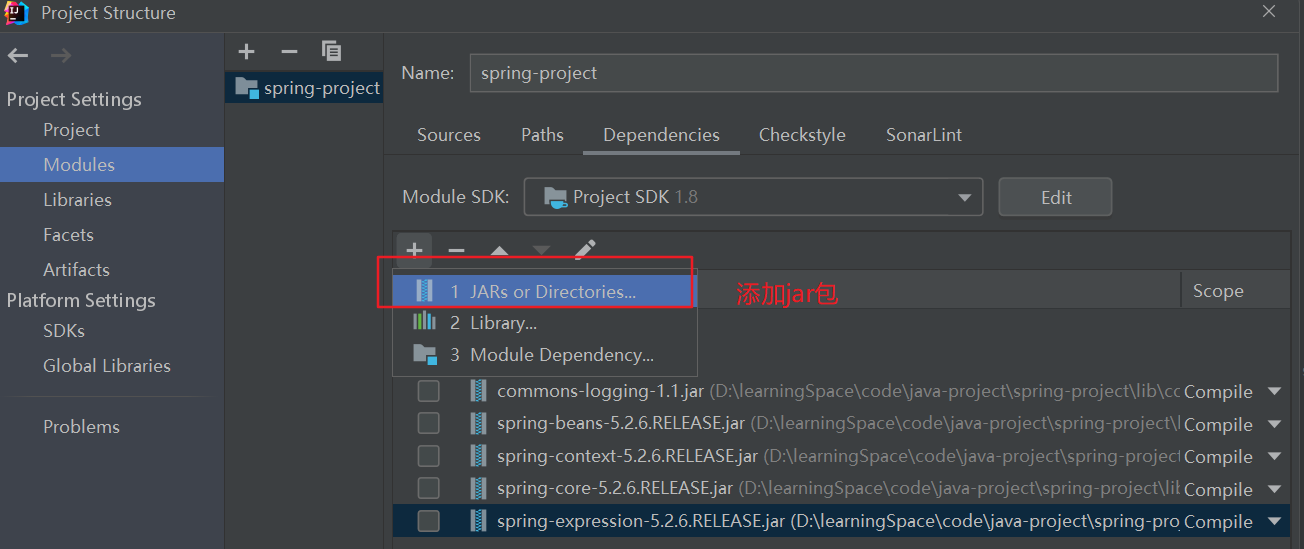
image-20220527104041457 使用 Spring 方式创建对象
8.1 普通方式创建
// 普通方式创建类
public class User {
  public static void main(String[] args) {

  }

  /**
   * 普通方式创建方法
   */
  public void add() {
    System.out.println("add...");
  }
}
8.2 创建 Spring 配置文件,在配置文件配置创建的对象
- Spring 配置文件格式使用 xml 文件 选择 src 文件夹,右键选择
new ->XML Configuration File -> Spring Cinfig创建 Spring 配置 xml 文件
<?xml version="1.0" encoding="UTF-8"?>
<beans xmlns="http://www.springframework.org/schema/beans"
       xmlns:xsi="http://www.w3.org/2001/XMLSchema-instance"
       xsi:schemaLocation="http://www.springframework.org/schema/beans http://www.springframework.org/schema/beans/spring-beans.xsd">
    <!--配置User对象创建-->
    <bean id="User" class="com.company.User"></bean>
</beans>
8.3 进行测试代码编写
@Test
public void testAddUser() {
   //1.加载spring配置文件
   ApplicationContext context = new ClassPathXmlApplicationContext("spring-options.xml");
   //2.获取配置创建的对象
   User user = context.getBean("User", User.class);
   System.out.println(user);
   user.add();
}
输出结果 com.company.User@59906517 add...
- Spring 配置文件格式使用 xml 文件 选择 src 文件夹,右键选择
Spring 概念
Spring 是 Java EE 编程领域的一个轻量级开源框架
Spring 可以解决企业应用开发的复杂性
Spring 有两个核心部分:IOC 和 Aop
3.1 IOC:控制反转,把创建对象过程交给 Spring 进行管理
3.2 Aop:面向切面,不修改源代码,进行增强
特点
4.1 方便解耦,简化开发
4.2 Aop 编程支持
4.3 方便程序测试
4.4 方便进行事务操作
4.5 降低 API 开发难度
IOC 容器
一、IOC 概念
- 控制反转:把对象的创建和对象之间的调用过程,从程序员手里转交给 Spring 进行管理
- 使用 IOC 的目的:为了降低耦合度
- 入门案例就是 IOC 实现(8.使用 Spring 方式创建对象)
二、IOC 底层原理
IOC 目的:耦合度降到最低
xml 解析、工厂模式、反射
1.1 原始模式
class UserServive{
   execute() {
      UserDao dao = new UserDao()
      dao.add()
   }
}
class UserDao{
   add() {
      //...
   }
}
1.2 工厂模式(耦合度降低)
class UserServive{
   execute() {
      UserDao dao = UserFactory.getDao()
      dao.add()
   }
}
class UserDao{
   add() {
      //...
   }
}
// 创建工厂
class UserFactory {
   public static UserDao getDao() {
      return new new UserDao();
   }
}
IOC 过程(耦合度进一步降低) 2.1 xml 配置文件,配置创建的对象
<bean id="dao" class="com.atguigu.UserDao"></bean>2.2 有 service 类 和 dao 类,创建工厂类
class UserFactory {
   pubilc static UserDao getDao() {
      String classValue = class属性值; // a、xml 解析
      // b、通过反射创建对象
      Class clazz = Class.forName(classValue);
      retrun (UserDao)clazz.newInstance();
   }
}
三、IOC 接口(BeanFactory)
IOC 思想,基于 IOC 容器完成,IOC 容器底层就是对象工程
Spring 提供 IOC 容器实现的两种方式(两个接口):
2.1.
BeanFactory:IOC容器基本实现,是 Spring 内部使用接口,不提供开发人员使用 加载配置文件的时候不会创建对象,在获取对象(使用)才会创建对象2.2.
ApplicationContext:BeanFactory接口的子接口,提供更多接口,一般由开发人员使用 加载配置文件的时候就会在配置文件对象进行创建
四、IOC 操作 Bean 管理
什么是 Bean 管理
Bean 管理的两个操作:1、Spring 创建对象 2、Spring 注入属性
Bean 管理两种操作方式
- 基于 XML 配置文件方式事项
- 基于注解方式实现
IOC 操作 Bean 管理(基于 XML)
基于 xml 方式创建对象
<!--配置User对象创建-->
<bean id="User" class="com.company.User"></bean>
- 在 spring 配置文件中,使用 bean 标签,标签里面添加对应属性,就可以实现对象创建
- 在 bean 标签由很多属性,介绍常用属性
- id 属性:唯一标识
- class 属性:类全路径(包类路径)
- name 属性:和 id 属性类似,但是 name 属性可以设置特殊符号,id 属性不能设置特殊符号
- 创建对象的时候,默认也是执行无参构造方法(重写默认无参构造方法后报错如下:)
提示
org.springframework.context.support.AbstractApplicationContext refresh 警告: Exception encountered during context initialization - cancelling refresh attempt: org.springframework.beans.factory.BeanCreationException: Error creating bean with name 'User' defined in class path resource [spring-options.xml]: Instantiation of bean failed;
public class User {
    private String userName;
    // 快捷键:Alt+insert
    public User(String userName) {
        this.userName = userName;
    }

    /**
     * 普通方式创建方法
     */
    public void add() {
        System.out.println("add...");
    }
}
基于 xml 方式注入属性
常规方法
package com.company;

public class Book {
    private String bookName;
    /**
     * Set方法注入
     */
    public void setBookName(String bookName) {
        this.bookName = bookName;
    }
    /**
     * 有参数构造注入
     */
    public Book(String bookName) {
        this.bookName = bookName;
    }
    /**
     * 原始方式,设置图书名称
     */
    public static void main(String[] args){
        Book book = new Book();
        book.setBookName("abc");
    }
}
DI:依赖注入,就是注入属性
第一种方式:使用 Set 方法注入
- 创建类,定义属性和对应的 set 方法
/** * 演示使用set方法进行属性注入 */ public class Book { //创建属性 private String bookName; private String bauthor; //创建属性对应的set方法 public void setBookName(String bookName) { this.bookName = bookName; } public void setBauthor(String bauthor) { this.bauthor = bauthor; } }- 在 Spring 配置文件配置对象创建,配置属性注入
<!--set方法注入属性--> <bean id="book" class="com.company.Book"> <!--使用 property 完成属性注入--> <property name="bookName" value="红楼梦"></property> <property name="bauthor" value="曹雪芹"></property> </bean>- 测试 Set 方法注入
public class BookTest {

 @Test
 public void testBook() {
     //1.加载spring配置文件
     ApplicationContext context = new ClassPathXmlApplicationContext("spring-options.xml");
     //2.获取配置创建的对象(参数1:xml设置id,参数2:对应类名)
     Book book = context.getBean("book", Book.class);
     System.out.println(book);

     book.testBookDemo();

 }
}
第二种方式:有参构造注入属性
- 创建类,定义属性和别写有参构造函数
public class Orders { //定义属性 private String orderCode; private String orderName; private String address; //有参构造 public Orders(String orderCode, String orderName, String address) { this.orderCode = orderCode; this.orderName = orderName; this.address = address; } }- 在 Spring 配置文件中进行配置
<!--有参构造注入属性--> <bean id="orders" class="com.company.Orders"> <constructor-arg index="0" name="orderCode" value="工单号"/> <constructor-arg index="1" name="orderName" value="工单名称"/> <constructor-arg index="2" name="address" value="详细地址"/> </bean>- 编写测试用例
@Test
public void testOrders() {
   //1.加载spring配置文件
   ApplicationContext context = new ClassPathXmlApplicationContext("spring-options.xml");
   //2.获取配置创建的对象
   Orders orders = context.getBean("orders", Orders.class);
   System.out.println(orders);
}
p 名称空间注入
- 使用 p 名称空间注入,可以简化基于 xml 配置方式
<?xml version="1.0" encoding="UTF-8"?> <beans xmlns="http://www.springframework.org/schema/beans" xmlns:xsi="http://www.w3.org/2001/XMLSchema-instance" xmlns:p="http://www.springframework.org/schema/p" xsi:schemaLocation="http://www.springframework.org/schema/beans http://www.springframework.org/schema/beans/spring-beans.xsd">- 进行属性注入,在 bean 标签进行注入
<!--使用p命名空间进行注入-->
 <bean id="book" class="com.company.Book" p:bookName="红楼梦" p:bauthor="曹雪芹">
 </bean>
基于 xml 方式注入其他类型属性
字面量
- null 值
<property name="address" >
   <null/>
</property>
- 属性值包含特殊符号
<!--属性值中包含特殊属性
1. 把<>进行转义 < >
2. 把带特殊符号内容写到 CDATA
-->
<property name="address">
<value><![CDATA[<<西游记>>]]></value>
</property>
注入属性-外部 bean
- 创建两个类 service 类和 dao 类
public interface UserDao {
   public void update();
}
public class UserDaoImpl implements UserDao {

    @Override
    public void update() {
        System.out.println("dao update");
    }
}
- 在 service 调用 dao 里面的方法
public class UserService {
    /**
     * 创建UserDao 类型属性,生成 set方法
     * 属性:可以是方法、类、字符串等
     */
    private UserDao userDao;
    public void setUserDao(UserDao userDao) {
        this.userDao = userDao;
    }

    public void add() {
        System.out.println("service add..........");
        /*
         * 原始方式:创建 UserDao 对象
         * */
//        UserDao user_dao = new UserDaoImpl();
//        user_dao.update();
    }
}
- 在 Spring 配置文件中进行配置
<?xml version="1.0" encoding="UTF-8"?>
<beans xmlns="http://www.springframework.org/schema/beans"
       xmlns:xsi="http://www.w3.org/2001/XMLSchema-instance"
       xsi:schemaLocation="http://www.springframework.org/schema/beans http://www.springframework.org/schema/beans/spring-beans.xsd">
    <!--1. service 和 dao 对象创建-->
    <bean id="userService" class="com.service.UserService">
        <!--注入 userDao 对象
            name属性值:类里面属性名称
            ref属性:创建 userDao 对象 bean 标签 id值
        -->
        <property name="userDao" ref="userDaoImpl"></property>
    </bean>
    <bean id="userDaoImpl" class="com.dao.UserDaoImpl"></bean>
</beans>
- 编写测试用例
@Test
public void testAddUser() {
   //1.加载spring配置文件
   ApplicationContext context = new ClassPathXmlApplicationContext("external-bean.xml");
   //2.获取配置创建的对象
   UserService userService = context.getBean("userService", UserService.class);
   System.out.println(userService);

   userService.add();
}
注入属性-内部 bean
- 一对多关系:部门和员工(一个部门有多个员工,一个员工属于一个部门,部门是一,员工是多)
- 在实体类之间表示一对多的关系
/**
 * 创建部门类
 */
public class Dept {
    private String name;

    public void setName(String name) {
        this.name = name;
    }
}

/**
 * 员工类
 */
public class Emp {
    private String name;
    private String gemder;

    /*员工属于某一个部门使用对象表示*/
    private Dept dept;

    public void setName(String name) {
        this.name = name;
    }

    public void setGemder(String gemder) {
        this.gemder = gemder;
    }

    public void setDept(Dept dept) {
    }
}
- 通过 Spring 的 xml 配置文件进行配置
<!--内部bean-->
<bean id="emp" class="com.bean.Emp">
   <!--先设置普通属性-->
   <property name="name" value="张三"></property>
   <property name="gemder" value="男"></property>
   <!--设置对象类型属性-->
   <property name="dept">
      <bean id="dept" class="com.bean.Dept">
         <property name="name" value="研发部"></property>
      </bean>
   </property>
</bean>
- 编写测试用例
@Test
public void testInsideBean() {
   //1.加载spring配置文件
   ApplicationContext context = new ClassPathXmlApplicationContext("inside-bean.xml");
   //2.获取配置创建的对象
   Emp emp = context.getBean("emp", Emp.class);

   System.out.println(emp);

   emp.add();
   emp.toString();
}
注入属性-级联赋值
- 创建类
/**
 * 创建部门类
 */
public class Dept {
    private String name;

    public void setName(String name) {
        this.name = name;
    }
}

/**
 * 员工类
 */
public class Emp {
    private String name;
    private String gemder;

    /*员工属于某一个部门使用对象表示*/
    private Dept dept;

    public void setName(String name) {
        this.name = name;
    }

    public void setGemder(String gemder) {
        this.gemder = gemder;
    }

    public void setDept(Dept dept) {
    }
}
xml 级联配置
第一种写法
<!--级联赋值--> <bean id="emp" class="com.bean.Emp"> <!--先设置普通属性--> <property name="name" value="张三"></property> <property name="gemder" value="男"></property> <!--级联赋值--> <property name="dept" ref="dept"></property> </bean> <bean id="dept" class="com.bean.Dept"> <property name="name" value="研发部"></property> </bean>第二种写法(dept.name 需要生成 dept 对应的 get 方法)
<!--级联赋值-->
 <bean id="emp" class="com.bean.Emp">
    <!--先设置普通属性-->
    <property name="name" value="张三"></property>
    <property name="gemder" value="男"></property>
    <!--级联赋值-->
    <property name="dept" ref="dept"></property>
    <property name="dept.name" value="开发部"></property>
 </bean>
 <bean id="dept" class="com.bean.Dept">
    <property name="name" value="研发部"></property>
 </bean>
编写测试用例
@Test
public void testCascade() {
   //1.加载spring配置文件
   ApplicationContext context = new ClassPathXmlApplicationContext("cascade.xml");
   //2.获取配置创建的对象
   Emp emp = context.getBean("emp", Emp.class);

   System.out.println(emp);

   emp.add();
   emp.toString();
}
IOC 操作 Bean 管理(xml 注入集合属性)
注入数组类型属性
注入 List 集合类型属性
注入 Map 集合类型属性
- 创建类,定义数组、list map set 类型属性,并生成对应的 set 方法
public class Stu { //1.数组类型属性 private String[] courses; //2.list 集合类型属性 private List<String> list; //3.map集合类型属性 private Map<String, String> maps; //set集合类型属性 private Set<String> sets; public void setCourses(String[] courses) { this.courses = courses; } public void setList(List<String> list) { this.list = list; } public void setMaps(Map<String, String> maps) { this.maps = maps; } public void setSets(Set<String> sets) { this.sets = sets; } public void test() { System.out.println(Arrays.toString(courses)); System.out.println(sets); System.out.println(maps); System.out.println(list); } }- 在 Spring xml 配置文件中进行配置
<!--集合类型数据配置--> <bean id="stu2" class="com.aggregatearr.Stu"> <!--数组类型属性注入--> <property name="courses"> <array> <value>java</value> <value>php</value> </array> </property> <!--list类型属性注入--> <property name="list"> <list> <value>javaScript</value> <value>数据结构算法</value> </list> </property> <!--map类型属性注入--> <property name="maps"> <map> <entry key="c" value="C"></entry> <entry key="c++" value="C++"></entry> <entry key="java" value="JAVA"></entry> </map> </property> <!--set类型属性注入--> <property name="sets"> <set> <value>MySql</value> <value>Reads</value> </set> </property> </bean>- 编写测试用例
@Test
 public void testStu() {
     //1.加载spring配置文件
     ApplicationContext context = new ClassPathXmlApplicationContext("aggregate-list.xml");
     //2.获取配置创建的对象(参数1:xml设置id,参数2:对应类名)
     Stu stu = context.getBean("stu2", Stu.class);
     stu.test();
 }
在集合里面设置对象类型值
 <!--集合类型数据配置-->
<bean id="stu2" class="com.aggregatearr.Stu">
   <!--2.注入list集合类型,值是对象-->
   <property name="couresList">
      <list>
            <ref bean="course1"></ref>
            <ref bean="course2"></ref>
      </list>
   </property>
</bean>

<!--1.创建多个 courses 对象-->
<bean id="course1" class="com.aggregatearr.Coures">
   <property name="cname" value="JAVA"></property>
</bean>
<bean id="course2" class="com.aggregatearr.Coures">
   <property name="cname" value="Spring5"></property>
</bean>
把集合注入部分提取出来
- 在 Spring 配置文件中引入命名空间 util
<?xml version="1.0" encoding="UTF-8"?> <beans xmlns="http://www.springframework.org/schema/beans" xmlns:xsi="http://www.w3.org/2001/XMLSchema-instance" xmlns:util="http://www.springframework.org/schema/util" xsi:schemaLocation="http://www.springframework.org/schema/beans http://www.springframework.org/schema/beans/spring-beans.xsd http://www.springframework.org/schema/util http://www.springframework.org/schema/util/spring-util.xsd"> </beans>- 使用 util 标签完成 list 集合注入提取
<?xml version="1.0" encoding="UTF-8"?>
<beans xmlns="http://www.springframework.org/schema/beans"
      xmlns:xsi="http://www.w3.org/2001/XMLSchema-instance"
      xmlns:util="http://www.springframework.org/schema/util"
      xsi:schemaLocation="http://www.springframework.org/schema/beans http://www.springframework.org/schema/beans/spring-beans.xsd
                           http://www.springframework.org/schema/util http://www.springframework.org/schema/util/spring-util.xsd">
   <!--1.提取list集合类型属性配置-->
   <util:list id="booksList">
      <value>Spring</value>
      <value>Java</value>
      <value>MySQL</value>
   </util:list>
   <!--2.提取list集合类型属性注入使用-->
   <bean id="books" class="com.aggregatearr.Books">
      <property name="list" ref="booksList"></property>
   </bean>
</beans>
IOC 操作 Bean 管理(FactoryBean)
Spring 有两种类型的 bean 一种普通 bean,一种工厂 bean(FactoryBean)
普通 Bean:定义什么类型就是返回类型
- 创建两个类 service 类和 dao 类
public interface UserDao {
   public void update();
}
public class UserDaoImpl implements UserDao {

    @Override
    public void update() {
        System.out.println("dao update");
    }
}
- 在 service 调用 dao 里面的方法
public class UserService {
    /**
     * 创建UserDao 类型属性,生成 set方法
     * 属性:可以是方法、类、字符串等
     */
    private UserDao userDao;
    public void setUserDao(UserDao userDao) {
        this.userDao = userDao;
    }

    public void add() {
        System.out.println("service add..........");
        /*
         * 原始方式:创建 UserDao 对象
         * */
//        UserDao user_dao = new UserDaoImpl();
//        user_dao.update();
    }
}
- 在 Spring 配置文件中进行配置
<?xml version="1.0" encoding="UTF-8"?>
<beans xmlns="http://www.springframework.org/schema/beans"
       xmlns:xsi="http://www.w3.org/2001/XMLSchema-instance"
       xsi:schemaLocation="http://www.springframework.org/schema/beans http://www.springframework.org/schema/beans/spring-beans.xsd">
    <!--1. service 和 dao 对象创建-->
    <bean id="userService" class="com.service.UserService">
        <!--注入 userDao 对象
            name属性值:类里面属性名称
            ref属性:创建 userDao 对象 bean 标签 id值
        -->
        <property name="userDao" ref="userDaoImpl"></property>
    </bean>
    <bean id="userDaoImpl" class="com.dao.UserDaoImpl"></bean>
</beans>
- 编写测试用例
@Test
public void testAddUser() {
   //1.加载spring配置文件
   ApplicationContext context = new ClassPathXmlApplicationContext("external-bean.xml");
   //2.获取配置创建的对象
   UserService userService = context.getBean("userService", UserService.class);
   System.out.println(userService);

   userService.add();
}
工厂 Bean (FactoryBean):在配置文件定义 bean 类型,可以和返回类型不一致
第一步:创建类,让这个类作为工厂 bean 实现接口 FactoryBean
第二步:实现接口里面的方法,在实现方法中定义返回 bean 类型
public class MyBean implements FactoryBean<Coures> {
    @Override
    public boolean isSingleton() {
        return FactoryBean.super.isSingleton();
    }

    /**
     * 定义返回bean
     */
    @Override
    public Coures getObject() throws Exception {
        Coures coures = new Coures();
        coures.setCname("张三");
        return coures;
    }

    @Override
    public Class<?> getObjectType() {
        return null;
    }
}
@Test
public void TestMyBean() {
   ApplicationContext context = new ClassPathXmlApplicationContext("mybean.xml");
   Coures coures = context.getBean("mybean", Coures.class);
   System.out.println(coures);
}
IOC 操作 Bean 管理(bean 作用域)
在 Spring 里面设置创建 bean 实例是单实例还是多实例
- 在 Spring 里面,默认情况下,bean 是单实例对象
@Test
public void testBooks() {
   //1.加载spring配置文件
   ApplicationContext context = new ClassPathXmlApplicationContext("aggregate-list2.xml");
   //2.获取配置创建的对象(参数1:xml设置id,参数2:对应类名)
   Books books = context.getBean("books", Books.class);
   Books books1 = context.getBean("books", Books.class);
   //默认单实例对象,两次输出地址一样
   System.out.println(books);
   System.out.println(books1);
   books.test();
}
// 输出结果
// com.aggregatearr.Books@3b94d659
// com.aggregatearr.Books@3b94d659
- 如何设置单实例还是多实例
- 在 Spring 配置文件 bean 标签里面由属性(scope)用于设置单实例还是多实例
- scope 属性值:a、默认值 singleton 表示单实例对象 b、prototype 表示多实例对象
<bean id="books" class="com.aggregatearr.Books" scope="prototype">
   <property name="list" ref="booksList"></property>
 </bean>
@Test public void testBooks() { //1.加载spring配置文件 ApplicationContext context = new ClassPathXmlApplicationContext("aggregate-list2.xml"); //2.获取配置创建的对象(参数1:xml设置id,参数2:对应类名) Books books = context.getBean("books", Books.class); Books books1 = context.getBean("books", Books.class); //默认单实例对象,两次输出地址一样 System.out.println(books); System.out.println(books1); books.test(); } // 输出结果 // com.aggregatearr.Books@4f2b503c // com.aggregatearr.Books@bae7dc0- singleton 和 prototype 区别
- singleton 单实例,prototype 多实例
- 设置 scope 值是 singleton 时候,加载 spring 配置文件的时候就会创建单实例对象
- 设置 scope 值是 prototype 时候,不是在加载 spring 配置文件的时候创建对象,在调用 getBean 方法的时候创建多实例对象
IOC 操作 Bean 管理(bean 生命周期)
生命周期:从对象创建到对象销毁的过程
bean 生命周期
- 通过构造器创建 bean 实例(无参构造)
- 为 bean 的属性设置值和对其他 bean 引用(调用 set 方法)
- 调用 bean 的初始化的方法(需要进行配置)
- bean 可以使用了(对象获取到了)
- 当容器关闭时候,调用 bean 的销毁的方法(需要进行配置销毁的方法)
生命周期演示代码
- 创建类
public class LifeCycleOrders {
   //无参构造
   public LifeCycleOrders() {
      System.out.println("1. 通过构造器创建 bean 实例(无参构造)");
   }

   private String oname;

   public void setOname(String oname) {
      this.oname = oname;
      System.out.println("2. 为 bean 的属性设置值和对其他 bean 引用(调用 set 方法)");
   }

   //创建执行初始化方法
   public void initMethod() {
      System.out.println("3. 调用 bean 的初始化的方法(需要进行配置)");
   }

   // 创建执行的销毁方法
   public void destroyMethod() {
      System.out.println("5. 当容器关闭时候,调用 bean 的销毁的方法(需要进行配置销毁的方法)");
   }
}
- 在 Spring xml 配置文件中配置
<bean id="lifeCycleOrders" class="com.lifecycle.LifeCycleOrders" init-method="initMethod" destroy-method="destroyMethod">
   <property name="oname" value="张三"></property>
</bean>
- 编写测试类
@Test
public void TestLifeCycleOrders() {
ClassPathXmlApplicationContext context = new ClassPathXmlApplicationContext("life-cycle-orders.xml");
   //        ApplicationContext context = new ClassPathXmlApplicationContext("life-cycle-orders.xml");
   //获取配置创建的对象(参数1:xml设置id,参数2:对应类名)
   LifeCycleOrders lco = context.getBean("lifeCycleOrders", LifeCycleOrders.class);
   System.out.println("4. bean 可以使用了(对象获取到了)");
   System.out.println(lco);

   // 手动让bean实例销毁:自动强制转换
   //        ((ClassPathXmlApplicationContext) context).close();
   context.close();
}
bean 的后置处理器(七步)
- 通过构造器创建 bean 实例(无参构造)
- 为 bean 的属性设置值和对其他 bean 引用(调用 set 方法)
- 把 bean 实例传递 bean 后置处理器的方法 postProcessBeforeInitialization
- 调用 bean 的初始化的方法(需要进行配置)
- 把 bean 实例传递 bean 后置处理器的方法 postProcessAfterInitialization
- bean 可以使用了(对象获取到了)
- 当容器关闭时候,调用 bean 的销毁的方法(需要进行配置销毁的方法)
演示添加后置处理器效果
- 创建类,实现接口 BeanPostProcessor 创建后置处理器
public class MyBeanPost implements BeanPostProcessor {
    @Override
    public Object postProcessBeforeInitialization(Object bean, String beanName) throws BeansException {
        System.out.println("在初始化之前执行该方法");
        return bean;
    }

    @Override
    public Object postProcessAfterInitialization(Object bean, String beanName) throws BeansException {
        System.out.println("在初始化之后执行该方法");
        return bean;
    }
}
- 在 Spring 配置文件中进行配置
<bean id="lifeCycleOrders" class="com.lifecycle.LifeCycleOrders" init-method="initMethod" destroy-method="destroyMethod">
   <property name="oname" value="张三"></property>
</bean>

<!--配置后置处理器:会将当前配置文件的所有配置都添加后置处理器-->
<bean id="myBeanPost" class="com.lifecycle.MyBeanPost"></bean>
IOC 操作 Bean 管理(xml 自动装配)
自动装配:根据指定装配规则(属性名称或者属性类型),Spring 自动将匹配的属性进行注入
演示自动装配
- 根据属性名称自动装配
<!--实现自动装配
    bean 标签属性 autowire 配置自动装配
    autowire 属性常用两个值:
        byName 根据属性名称注入,注入值 bean的id值和类属性名称一样
        byType 根据属性类型注入
    -->
    <bean id="emp" class="com.autowire.Emp" autowire="byName">
<!--        <property name="dept" ref="dept"></property>-->
    </bean>
    <bean id="dept" class="com.autowire.Dept"></bean>
- 根据属性类型自动装配
<!--实现自动装配
    bean 标签属性 autowire 配置自动装配
    autowire 属性常用两个值:
        byName 根据属性名称注入,注入值 bean的id值和类属性名称一样
        byType 根据属性类型注入
    -->
    <bean id="emp" class="com.autowire.Emp" autowire="byType">
<!--        <property name="dept" ref="dept"></property>-->
    </bean>
    <bean id="dept" class="com.autowire.Dept"></bean>
IOC 操作 Bean 管理(xml 外部属性文件)
直接配置数据库信息
- 配置德鲁伊连接池
- 引入德鲁伊 jar 包依赖
- 在配置文件中配置
<!--配置直接连接池-->
<bean id="dataSource" class="com.alibaba.druid.pool.DruidDataSource">
   <!-- 直接配置 -->
   <property name="driverClassName" value="com.mysql.jdbc.Driver"></property>
   <property name="url" value="jdbc:mysql://localhost:3306/userDb"></property>
   <property name="username" value="root"></property>
   <property name="password" value="root"></property>
</bean>
引入外部属性文件配置数据库连接池
- 创建外部属性文件,properties 格式文件(jdbc.properties),写数据库信息
prop.driverClass=com.mysql.jdbc.Driver prop.url=jdbc:mysql://localhost:3306/userDb prop.userName=root prop.password=root- 把外部 properties 属性文件引入到 spring 配置文件中
- 引入 context 命名空间
<?xml version="1.0" encoding="UTF-8"?> <beans xmlns="http://www.springframework.org/schema/beans" xmlns:xsi="http://www.w3.org/2001/XMLSchema-instance" xmlns:context="http://www.springframework.org/schema/context" xsi:schemaLocation="http://www.springframework.org/schema/beans http://www.springframework.org/schema/beans/spring-beans.xsd http://www.springframework.org/schema/context http://www.springframework.org/schema/context/spring-context.xsd">- 在 Spring 配置文件使用标签引入外部属性文件
<!--引入外部属性文件-->
 <context:property-placeholder location="jdbc.properties"/>
 <!--配置连接池-->
 <bean id="dataSource" class="com.alibaba.druid.pool.DruidDataSource">
     <property name="driverClassName" value="${prop.driverClass}"></property>
     <property name="url" value="${prop.url}"></property>
     <property name="username" value="${prop.userName}"></property>
     <property name="password" value="${prop.password}"></property>
 </bean>
IOC 操作 Bean 管理(注解方式)
注解:
- 注解是代码里特殊的标记,格式(@注解名称(属性名称=属性值,属性名称=属性值...))
- 使用注解,注解作用在类、方法、属性上面
- 使用注解目的:简化 xml 配置
IOC 操作 Bean 管理(注解方式:创建对象)
- @Component 普通对象
- @Service 业务逻辑层
- @Controller WEB 层
- @Repository 持久层
上面四个注解功能是一样的,都可以用来创建 bean 实例
基于注解方式实现对象创建
- 引入 spring-aop-5.2.6.RELEASE.jar 包依赖到项目中
- 开启组件扫描
<!--开启组件扫描
1. 扫描多个包,多个包使用逗号分割
2. 扫描多个包,写需要扫描多个包对应的上层包名
-->
<!--<context:component-scan base-package="com.annotation.dao,com.annotation.service"></context:component-scan>-->
<context:component-scan base-package="com.annotation"></context:component-scan>
- 创建类,在类上面添加创建对象注解
/**
 * 在注解里面 value 属性值可以省略不屑,默认值是类名称,首字母小写
 */
@Service(value = "userService")
public class UserService {
   public void add(){
      System.out.println("user-service-add...");
   }
}
- 编写测试类
@Test
public void TestUserService() {
   ApplicationContext context = new ClassPathXmlApplicationContext("annotation.xml");
   UserService user_service = context.getBean("userService", UserService.class);
   System.out.println(user_service);
   user_service.add();
}
IOC 操作 Bean 管理(注解方式:组件扫描配置)
- 示例 1:扫描包含对应注解
<!--组件扫描配置:示例1
   use-default-filters="false" 表示现在不使用默认 filter,自己配置 filter
   context:include-filter 设置扫描那些内容(下面代码表示只扫描annotation包中,带有 @Controller 注解的方法或对象)
-->
<context:component-scan base-package="com.annotation" use-default-filters="false">
   <context:include-filter type="annotation" expression="org.springframework.stereotype.Controller"/>
</context:component-scan>
- 示例 2:扫描不包含对应注解
<!--组件扫描配置:示例2
   下面配置扫描包所有内容
   context:exclude-filter 设置哪些类或方法不进行扫描(下面代码表示不扫描annotation包中,带有 @Component 注解的方法或对象)
-->
<context:component-scan base-package="com.annotation">
   <context:exclude-filter type="annotation" expression="org.springframework.stereotype.Component"/>
</context:component-scan>
IOC 操作 Bean 管理(注解方式:注入属性)
- @AutoWired 根据属性类型自动注入
- @Qualifier 根据属性名称进行注入
- @Resource 可以根据属性类型注入也可以根据属性名称进行注入
- @Value 注入普通类型属性
@AutoWired 根据属性类型自动注入
- 把 service 和 dao 对象创建,在 service 和 dao 类添加创建对象注解
@Repository
public class UserDaoImpl implements UserDao {

    @Override
    public void add() {
        System.out.println("add dao....");
    }
}


/**
 * 在注解里面 value 属性值可以省略不屑,默认值是类名称,首字母小写
 */
@Service(value = "userService")
public class UserService {
    /**
     *定义dao类型属性,不需要添加 set 方法,添加注入属性的注解
     */
    @Autowired//根据类型进行注入
    private UserDao userDao;

    public void add(){
        System.out.println("user-service-add...");
        userDao.add();
    }
}
- 在 service 中注入 dao 对象,在 service 类添加 dao 类型属性,在属性上面使用注解
/**
 * 在注解里面 value 属性值可以省略不屑,默认值是类名称,首字母小写
 */
@Service(value = "userService")
public class UserService {
    /**
     *定义dao类型属性,不需要添加 set 方法,添加注入属性的注解
     */
    @Autowired
    private UserDao userDao;

    public void add(){
        System.out.println("user-service-add...");
        userDao.add();
    }
}
@Qualifier 根据属性名称进行注入
@Qualifier 注解使用要和 @Autowired 注解一起使用
// UserDaoImpl
@Repository(value = "UserDaoImplOne")
public class UserDaoImpl implements UserDao {

    @Override
    public void add() {
        System.out.println("add dao....");
    }
}

// UserService
/**
 * 在注解里面 value 属性值可以省略不屑,默认值是类名称,首字母小写
 */
@Service(value = "userService")
public class UserService {
    /**
     *定义dao类型属性,不需要添加 set 方法,添加注入属性的注解
     */
    @Autowired //根据类型进行注入
    @Qualifier(value = "UserDaoImplOne") //根据名称进行注入
    private UserDao userDao;

    public void add(){
        System.out.println("user-service-add...");
        userDao.add();
    }
}
@Resource 可以根据属性类型注入也可以根据属性名称进行注入
@Service
public class StudentService {
    //@Resource //根据类型进行注入
    @Resource(name ="UserDaoImplOne") // 根据名称进行注入
    private UserDao userDao;
    public void add() {
        System.out.println("student service...");
        userDao.add();
    }
}
@Value 注入普通类型属性
@Service
public class StudentService {
    @Value(value = "张三") //注入普通类型
    private String name;

    //@Resource //根据类型进行注入
    @Resource(name ="UserDaoImplOne") // 根据名称进行注入
    private UserDao userDao;
    public void add() {
        System.out.println("student service...");
        userDao.add();
        System.out.println(name);
    }
}
IOC 操作 Bean 管理(注解方式:完全注解开发,不写 xml 文件)
- 创建配置类,替代 xml 配置文件
package com.annotation.config;

import org.springframework.beans.factory.annotation.Configurable;
import org.springframework.context.annotation.ComponentScan;

@Configurable // 作为配置类,替代xml配置文件
@ComponentScan(basePackages = {"com.annotation"})
public class SpringConfig {

}
- 编写测试用例
public class SpringConfigTest {
    @Test
    public void testConfig() {
        ApplicationContext context = new AnnotationConfigApplicationContext(SpringConfig.class);
        UserService userService = context.getBean("userService", UserService.class);
        System.out.println(userService);
        userService.add();
    }
}
Aop
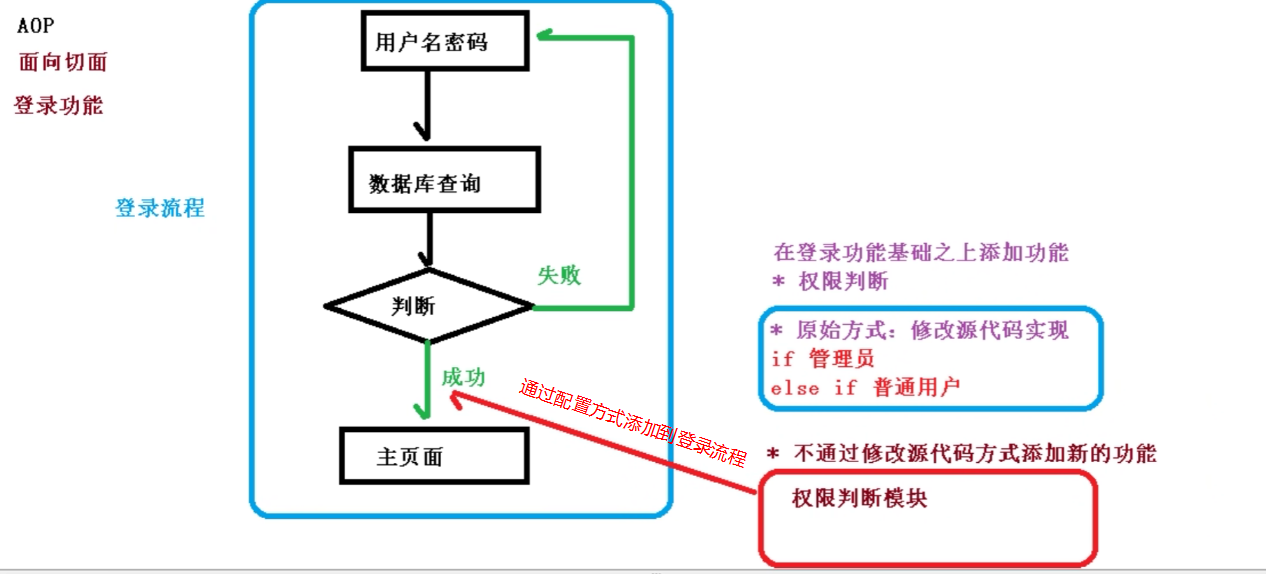
Aop 概念
- AOP 为 Aspect Oriented Programming 的缩写,意为:面向切面编程,利用 AOP 可以对业务逻辑的各个部分进行隔离,从而使得业务逻辑各部分之间的耦合度降低,提高程序的可重用性,同时提高了开发的效率。
- 通俗描述:不通过修改源代码方式,在主干功能里面添加新的功能
- 登录示例说明
Aop 底层原理
Aop 底层使用动态代理
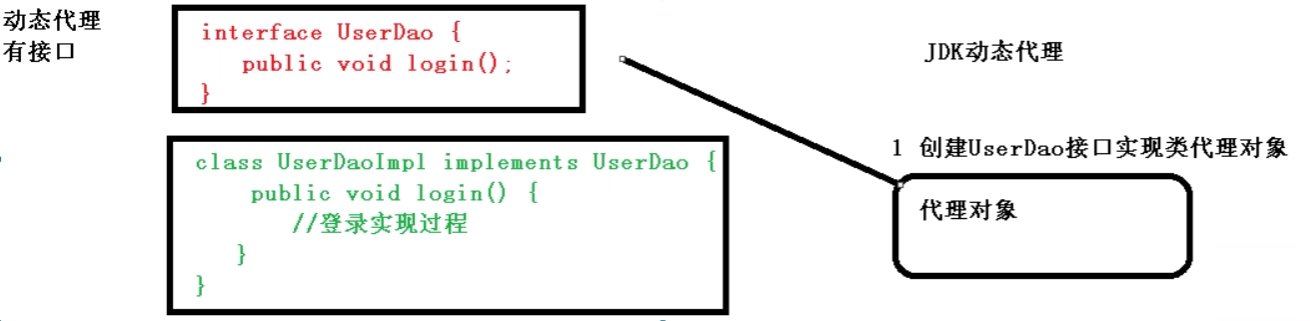
有接口情况,使用 JDK 动态代理
- 定义接口和接口实现类
// 接口
interface UserDao {
   pubilc void login()
}
// 接口实现类
class UserDaoImpl IMPLEMENTS userDao {
   pubilc void login() {
      // 登录实现过程
   }
}
- JDK 动态代理
- 创建接口实现类代理对象,增强类的方法
- 创建接口实现类代理对象,增强类的方法
没有接口情况,使用 CGLIB 动态代理
创建子类代理对象,增强类的方法 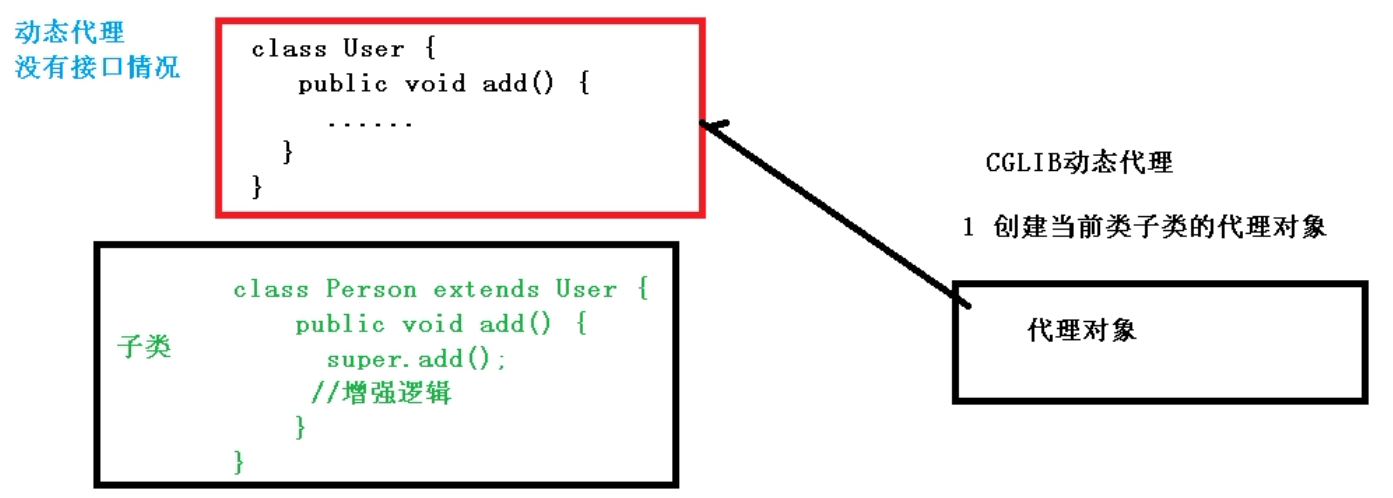
Aop (JDK 动态代理)代码演示
使用 JDK 动态代理,使用 Proxy 类里面的方法创建代理对象,在
java.lang.reflect.Proxy- 调用 newProxyInstance 方法,这个方法有三个参数,
- 类加载器
- 增强方法所在的类,这个类实现的接口,支持多个接口
- 实现这个接口 InvocationHandler 创建代理对象,写增强的方法
- 调用 newProxyInstance 方法,这个方法有三个参数,
编写 JDK 动态代理代码
- 创建接口,定义方法
public interface OrdersDao { public int add(int price, int number); public String upDate(String id); }- 创建接口实现类,实现方法
public class OrdersDaoImpl implements OrdersDao{ @Override public int add(int price, int number) { System.out.println(price * number); return price; } @Override public String upDate(String id) { return id; } }- 使用 Proxy 类创建接口代理对象
import java.lang.reflect.InvocationHandler;
import java.lang.reflect.Method;
import java.lang.reflect.Proxy;
import java.util.Arrays;

public class JDKProxy {
   public static void main(String[] args) {
      // 创建接口实现类代理对象
      Class[] interfaces = {OrdersDao.class};
      // 匿名内部类实现方式
//        Proxy.newProxyInstance(JDKProxy.class.getClassLoader(), interfaces, new InvocationHandler() {
//            @Override
//            public Object invoke(Object proxy, Method method, Object[] args) throws Throwable {
//                return null;
//            }
//        });
      // 外部类实现方式
      OrdersDaoImpl orderDao = new OrdersDaoImpl();
      OrdersDao dao = (OrdersDao) Proxy.newProxyInstance(JDKProxy.class.getClassLoader(), interfaces, new OrderDaoProxy(orderDao));
      int result = dao.add(80, 120);
      System.out.println(result);
   }
}
// 创建代理对象代码
class OrderDaoProxy implements InvocationHandler{
   //1 把创建的是谁的代理对象,把谁传递过来
   //有参构造传递
   private Object obj;
   public OrderDaoProxy(Object obj) {
      this.obj = obj;
   }

   // 增强的逻辑
   @Override
   public Object invoke(Object proxy, Method method, Object[] args) throws Throwable {
      // 方法之前
      System.out.println("方法之前执行...." + method.getName() + "传递的参数...." + Arrays.toString(args));
      //被增强的方法执行
      Object result = method.invoke(obj, args);
      // 方法之后
      System.out.println("方法之后执行...." + obj);
      return result;
   }
}
Aop 术语
- 连接点:类里面哪些方法可以被增强,这些方法称为连接点
- 切入点:实际被真正增强的方法,称为接入点
连接点
类里面哪些方法可以被增强,这些方法称为连接点
切入点
实际被真正增强的方法,称为切入点
通知(增强)
- 实际增强的逻辑部分称为通知(增强)
- 通知有多种类型
- 前置通知:增强前执行
- 后置通知:增强后执行
- 环绕通知:增强前后都执行
- 异常通知:增强方法异常执行
- 最终通知:finally 增强方法无论,异常还是正常执行都会执行
切面
是动作,把通知应用到切入点过程
Aop 操作(准备)
- 在 Spring 框架中一般基于 AspectJ 实现 AOP 操作
- 什么是 AspectJ ? AspectJ 不是 Spring 组成部分,独立 AOP 框架,一般把 AspectJ 和 Spring 框架一起使用,进行 AOP 操作
- 基于 AspectJ 实现 AOP 操作
- 基于 xml 配置文件实现
- 基于注解方式实现(使用)
- 在项目工程里面引入 AOP 相关依赖
- 切入点表达式
- 切入点表达式作用:知道对哪个类里面的哪个方法进行增强
- 语法结构:
execution([权限修饰符][返回类型][类全路径][方法名称]([参数列表])) - 举例 1:对 com.atguigu.dao.BookDao 类里面的 add 方法进行增强
execution(*com.atguigu.dao.BookDao.add(...)) - 举例 2:对 com.atguigu.dao.BookDao 类里面的所有方法进行增强
execution(*com.atguigu.dao.BookDao.*(...)) - 举例 3:对 com.atguigu.dao 包里面所有类,类里面所有方法进行增强
execution(*com.atguigu.dao.*.*(...))
Aop 操作
Aop 操作(基于 AspectJ 注解)
- 创建类,在类里面定义方法
// 被增强的类
public class User {
   public void add() {
      System.out.println("add...");
   }
}
创建增强类,编写增强逻辑
- 在增强类里面,创建方法,让不同方法代表不同通知类型
//增强的类
public class UserProxy {
   //前置通知
   public void before() {
      System.out.println("before...");
   }
}
进行通知的配置
- 在 spring 配置文件中,开启注释扫描
<?xml version="1.0" encoding="UTF-8"?> <beans xmlns="http://www.springframework.org/schema/beans" xmlns:xsi="http://www.w3.org/2001/XMLSchema-instance" xmlns:context="http://www.springframework.org/schema/context" xmlns:aop="http://www.springframework.org/schema/aop" xsi:schemaLocation="http://www.springframework.org/schema/beans http://www.springframework.org/schema/beans/spring-beans.xsd http://www.springframework.org/schema/context http://www.springframework.org/schema/context/spring-context.xsd http://www.springframework.org/schema/aop http://www.springframework.org/schema/aop/spring-aop.xsd"> <!--1.开启注解扫描--> <context:component-scan base-package="com.aopanno"></context:component-scan> </beans>- 使用注解创建 User 和 UserProxy 对象
//增强的类
@Component
public class UserProxy {
   //前置通知
   public void before() {
      System.out.println("before...");
   }
}
// 被增强的类 @Component public class User { public void add() { System.out.println("add..."); } }- 在增强类上面添加注解 @Aspect
@Component @Aspect // 生成代理对象 public class UserProxy {}- 在 spring 配置文件中开启生成代理对象
<!--开启Aspect生成代理对象-->
<aop:aspectj-autoproxy></aop:aspectj-autoproxy>
配置不同类型的通知
- 在增强类的里面,在作为通知方法上面添加通知类型注解,使用切入点表达式
//增强的类
@Component
@Aspect // 生成代理对象
public class UserProxy {
   /**
   * 前置通知
   * @Before 注解表示作为前置通知
   */
   @Before(value="execution(* com.aopanno.User.add(..))")
   public void before() {
      System.out.println("before...");
   }

   /**
   * 后置通知(返回通知)
   */
   @AfterReturning(value="execution(* com.aopanno.User.add(..))")
   public void afterReturning() {
      System.out.println("afterThrowing...");
   }


   /**
   * 最终通知
   */
   @After(value="execution(* com.aopanno.User.add(..))")
   public void after() {
      System.out.println("after...");
   }

   /**
   * 异常通知
   */
   @AfterThrowing(value="execution(* com.aopanno.User.add(..))")
   public void afterThrowing() {
      System.out.println("afterThrowing...");
   }

   /**
   * 环绕通知,方法指向前后都执行
   */
   @Around(value="execution(* com.aopanno.User.add(..))")
   public void around(ProceedingJoinPoint proceedingJoinPoint) throws Throwable {
      System.out.println("环绕之前...");
      //被增强的刚发执行
      proceedingJoinPoint.proceed();

      System.out.println("环绕之后...");
   }
}
编写测试用例
public class TestAop {
   @Test
   public void testAopAnno() {
      ApplicationContext context = new ClassPathXmlApplicationContext("aopanno1.xml");
      User user = context.getBean("user", User.class);
      user.add();
   }
}
- 相同的切入点抽取
//增强的类
@Component
@Aspect // 生成代理对象
public class UserProxy {
    //相同的切入点进行抽取
   @Pointcut(value="execution(* com.aopanno.User.add(..))")
   public void pointdemo() {}
    /**
     * 前置通知
     * @Before 注解表示作为前置通知
     */
   @Before(value="pointdemo()") //使用抽取的切入点
   public void before() {
      System.out.println("before...");
    }
}
- 有多个增强类,对同一个方法进行增强,设置增强类的优先级
- 在增强类的上面添加注解 @Order(数字类型值),数字类型值越小优先级越高
@Component
@Aspect
@Order(1)
public class PersonProxy {
   @Before(value = "execution(* com.aopanno.User.add(..))")
   public void before() {
      System.out.println("PersonProxy...before");
   }
}
Aop 操作(基于 xml)
- 创建两个类,增强类和被增强类,创建方法
public class Books {
    public void buy() {
        System.out.println("buy...");
    }
}
public class BooksProxy {
    public void before() {
        System.out.println("before");
    }
}
- 在 spring 配置文件中创建两个对象
<!--创建对象-->
<bean id="book" class="com.aopxml.Books"></bean>
<bean id="booksProxy" class="com.aopxml.BooksProxy"></bean>
- 在 spring 配置文件中配置配置切入点
<?xml version="1.0" encoding="UTF-8"?>
<beans xmlns="http://www.springframework.org/schema/beans"
       xmlns:xsi="http://www.w3.org/2001/XMLSchema-instance"
       xmlns:aop="http://www.springframework.org/schema/aop"
       xsi:schemaLocation="http://www.springframework.org/schema/beans http://www.springframework.org/schema/beans/spring-beans.xsd
                            http://www.springframework.org/schema/aop http://www.springframework.org/schema/aop/spring-aop.xsd">
    <!--创建对象-->
    <bean id="books" class="com.aopxml.Books"></bean>
    <bean id="booksProxy" class="com.aopxml.BooksProxy"></bean>

    <!--配置AOP中的增强-->
    <aop:config>
        <!--切入点-->
        <aop:pointcut id="p" expression="execution(* com.aopxml.Books.buy(..))" />
        <!--配置切面-->
        <aop:aspect ref="booksProxy">
            <!--增强作用在具体的方法上-->
            <aop:before method="before" pointcut-ref="p"></aop:before>
        </aop:aspect>
    </aop:config>
</beans>
完全注解开发
import org.springframework.context.annotation.ComponentScan;
import org.springframework.context.annotation.Configuration;
import org.springframework.context.annotation.EnableAspectJAutoProxy;

@Configuration
@ComponentScan(basePackages = {"com"}) // 开启注解扫描
@EnableAspectJAutoProxy(proxyTargetClass = true) //生成AspectJ 扫描
public class ConfigAop {
}
JdbcTemplate
什么是 JdbcTemplate
Spring 框架对 JDBC 进行封装,使用 JdbcTemplate 方便实现对数据库操作
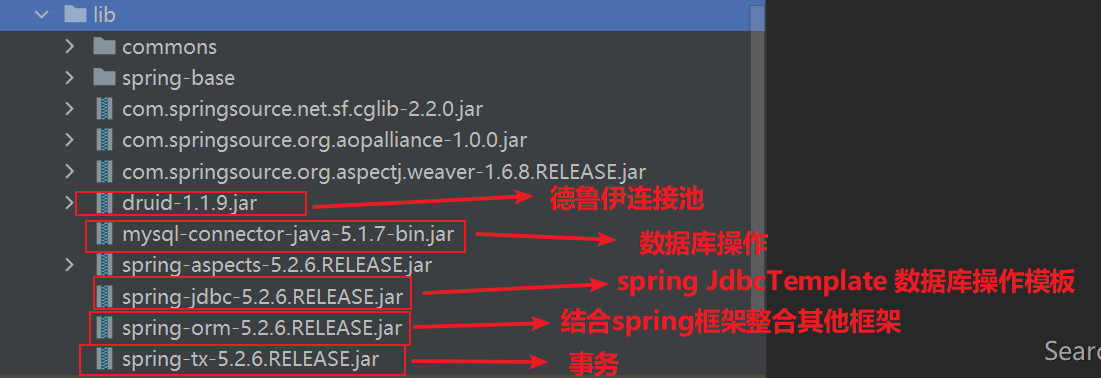
准备工作
- 引入相关 jar 包
- 在 spring 配置文件中配置数据库连接池,在 src 文件夹下新建 database-connect.xml 文件,使用德鲁伊连接池
<?xml version="1.0" encoding="UTF-8"?>
<beans xmlns="http://www.springframework.org/schema/beans"
      xmlns:xsi="http://www.w3.org/2001/XMLSchema-instance"
      xmlns:context="http://www.springframework.org/schema/context"
      xsi:schemaLocation="http://www.springframework.org/schema/beans http://www.springframework.org/schema/beans/spring-beans.xsd
                           http://www.springframework.org/schema/context http://www.springframework.org/schema/context/spring-context.xsd">

   <!--引入外部属性文件
   外部文件 jdbc.properties 和xml配置文件同级,文件内容如下
   prop.driverClass=com.mysql.jdbc.Driver
   prop.url=jdbc:mysql://localhost:3306/mydb
   prop.userName=root
   prop.password=root
   -->
   <!-- 读取外部数据库配置文件 -->
   <context:property-placeholder location="jdbc.properties"/>

   <!--配置连接池-->
   <bean id="dataSource" class="com.alibaba.druid.pool.DruidDataSource">
      <property name="driverClassName" value="${prop.driverClass}"></property>
      <property name="url" value="${prop.url}"></property>
      <property name="username" value="${prop.userName}"></property>
      <property name="password" value="${prop.password}"></property>
   </bean>
</beans>
- 配置 JdbcTeplate 对象,注入 DataSouce
<!--通过调用jdbcTemplate和上面地址池配置的数据库连接配置,实现对MySQL数据库的连接-->
<bean id="jdbcTemplate" class="org.springframework.jdbc.core.JdbcTemplate">
   <!--注入dataSource-->
   <property name="dataSource" ref="dataSource"></property>
</bean>
创建 service 类,创建 dao 类,在 dao 注入 jdbcTemplate 对象
配置文件开启组件扫描
<!--组件扫描,对注解标记符进行搜索,完成对类对象的创建,和属性值的注入-->
 <context:component-scan base-package="com.company"></context:component-scan>
Service
@Service
public class BookService {
   /**
   * 注入dao
   */
   @Autowired
   private BookDao bookDao;
}
Dao
@Repository
public class BookDaoImp implements BookDao {
   /**
   * 注入JdbcTemplate
   */
   @Autowired
   private JdbcTemplate jdbcTemplate;
}
JdbcTemplate 操作数据库
添加
- 对应数据库表创建实体类 entity/Book
public class Book {
    /**
    * private作为一种权限修饰符可以修饰类、属性和方法;
    * 用private修饰的类、属性、方法,只能自己使用,别的类是不能访问的,
    * 也就是说对于别的类来说是隐藏不可见的,private一般不修饰类,但是可以修饰内部类。
    * */
    private int bookId;
    private String bookName;
    private String status;

    public int getBookId() {
        return bookId;
    }

    public void setBookId(int bookId) {
        this.bookId = bookId;
    }

    public String getBookName() {
        return bookName;
    }

    public void setBookName(String bookName) {
        this.bookName = bookName;
    }

    public String getStatus() {
        return status;
    }

    public void setStatus(String status) {
        this.status = status;
    }

    @Override
    public String toString() {
        return "Book{" +
                "bookId=" + bookId +
                ", bookName='" + bookName + '\'' +
                ", status='" + status + '\'' +
                '}';
    }
}
编写 service 和 dao 2.1. 在 dao 进行数据库添加数据操作
- 添加 dao 接口文件
import com.company.entity.Book; public interface BookDao { /** * 添加的方法 */ void add(Book book); }- 添加 dao 接口实现类
@Repository
public class BookDaoImp implements BookDao {
   /**
   * 注入JdbcTemplate
   */
   @Autowired
   private JdbcTemplate jdbcTemplate;

   @Override
   public void add(Book book) {
      /**
         * 调用 JdbcTemplate 对象里面的 update() 方法实现添加方法
         */
      //创建SQL语句
      String sql = "insert into book values (?,?,?)";
      //调用方法实现
      Object[] args = {book.getBookId(),book.getBookName(),book.getStatus()};
      int update = jdbcTemplate.update(sql ,args);
      System.out.println("新增"+update);
   }
}
2.2 在 service 中注入 dao 类并添加新增方法
@Service
public class BookService {
   /**
   * 注入dao
   */
   @Autowired
   private BookDao bookDao;

   /**
   * 添加方法
   */
   public void addBook(Book book) {
      bookDao.add(book);
   }
}
新建测试类,编写测试用例
public class TestJdbcTemlate {
   @Test
   public void TestAdd() {
      ApplicationContext context = new ClassPathXmlApplicationContext("database-connect.xml");
      BookService bookService = context.getBean("bookService", BookService.class);
      Book book = new Book();
      book.setBookId(2);
      book.setBookName("西游记");
      book.setStatus("可借阅");
      bookService.addBook(book);
   }
}
编辑和删除
- BookService 类
/**
* 删除方法
*/
public void deleteBook(Integer id) {
   bookDao.delete(id);
}

/**
* 编辑方法
*/
public void updateBook(Book book) {
   bookDao.update(book);
}
- BookDao 接口类
/**
* 编辑
* @param book
*/
void update(Book book);

/**
* 通过id删除
* @param id
*/
void delete(Integer id);
- BookDaoImp 接口实现类
@Override
public void update(Book book) {
   String sql = "update book set book_name=?,status=? where book_id=?";
   Object[] args = {book.getBookName(),book.getStatus(),book.getBookId()};
   int update = jdbcTemplate.update(sql ,args);
   System.out.println("修改"+update);
}


@Override
public void delete(Integer id) {
   String sql = "delete from book where book_id=?";
   int update = jdbcTemplate.update(sql, id);
   System.out.println("删除"+update);
}
- TestJdbcTemplate 测试类
@Test
public void TestUpdate() {
   ApplicationContext context = new ClassPathXmlApplicationContext("database-connect.xml");
   BookService bookService = context.getBean("bookService", BookService.class);
   Book book = new Book();
   book.setBookId(2);
   book.setBookName("《水浒传》");
   book.setStatus("阅");
   bookService.updateBook(book);
}


@Test
public void TestDelete() {
   ApplicationContext context = new ClassPathXmlApplicationContext("database-connect.xml");
   BookService bookService = context.getBean("bookService", BookService.class);
   bookService.deleteBook(1);
}
查询表记录数量
- BookService 类
/**
* 查询表记录数量
*/
public int findCount() {
   return bookDao.selectCount();
}
- BookDao 接口类
/**
* 查询表记录
* @return
*/
int selectCount();
- BookDaoImp 接口实现类
@Override
public int selectCount() {
   String sql = "select count(*) from book";
   /**
   * queryForObject(String sql, Class<T> requiredType)
   * 两个参数
   * 参数1:sql语句
   * 参数2:返回数据类型
   */
   Integer count = jdbcTemplate.queryForObject(sql,Integer.class);
   System.out.println("返回数据总条数"+count);
   return  count;
}
- TestJdbcTemplate 测试类
@Test
public void TestSelectCount() {
   ApplicationContext context = new ClassPathXmlApplicationContext("database-connect.xml");
   BookService bookService = context.getBean("bookService", BookService.class);
   bookService.findCount();
}
根据 id 查询详情
- BookService 类
/**
* 根据id查询
*/
public void queryById(Integer id) {
   bookDao.queryById(id);
}
- BookDao 接口类
/**
* 通过ID查询
* @param id
* @return
*/
Book queryById(Integer id);
- BookDaoImp 接口实现类
@Override
public Book queryById(Integer id) {
   /**
   * jdbcTemplate.queryForObject 实现查询返回对象
   * queryForObject(String sql, RowMapper<T>rowMapper, Object...args)
   * 三个参数
   * 1.参数1:sql语句
   * 2.参数2:RowMapper 是一个接口,针对返回不同类型数据,使用这个接口里面实现类完成数据封装
   * 3.参数3:sql语句值
   */
   //String sql = "select * from book book_id=?";
   String sql = "select book_name,status,book_id as bookID from book where book_id=?";
   Book book = jdbcTemplate.queryForObject(sql, new BeanPropertyRowMapper<Book>(Book.class), id);
   System.out.println("根据id查询" + book);
   return book;
}
- TestJdbcTemplate 测试类
@Test
public void TestQueryById() {
   ApplicationContext context = new ClassPathXmlApplicationContext("database-connect.xml");
   BookService bookService = context.getBean("bookService", BookService.class);
   bookService.queryById(2);
}
查询数据列表
- BookService 类
/**
* 查询列表/分页
*/
public List<Book> selectList() {
   return bookDao.selectBookList();
}
- BookDao 接口类
/**
* 查询列表
* @return
*/
List<Book> selectBookList();
- BookDaoImp 接口实现类
@Override
public List<Book> selectBookList() {
   /**
   * jdbcTemplate.query 分页列表查询
   * query(String sql, RowMapper<T> rowMapper, Object...args)
   * 三个参数
   * 1.参数1:sql语句
   * 2.参数2:RowMapper,是一个接口,针对返回不同类型数据,使用这个接口里面实现类完成数据封装
   * 3.参数3:sql语句值,可以省略不写
   */

   String sql = "select * from book";
   List<Book> book = jdbcTemplate.query(sql, new BeanPropertyRowMapper<Book>(Book.class));
   System.out.println("查询列表"+ book);
   return book;
}
- TestJdbcTemplate 测试类
@Test
public void TestSelectList() {
   ApplicationContext context = new ClassPathXmlApplicationContext("database-connect.xml");
   BookService bookService = context.getBean("bookService", BookService.class);
   bookService.selectList();
}
JdbcTemplate 操作数据库(批量操作)
- 批量操作:操作数据表里面多条记录
- 使用
jdbcTemplate.batchUpdate()方法实现批量的新增,编辑,删除jdbcTemplate.batchUpdate(String sql, List<Object[]> batchArgs)包含两个参数:- 参数 1:sql 语句
- 参数 2:List 集合,添加多条记录数据
JdbcTemplate 实现批量添加操作
- BookService 类
/**
* 批量添加方法
*/
public void bathAdd(List<Object[]> bathArgs) {
   bookDao.bathAddList(bathArgs);
}
- BookDao 接口类
/**
* 批量添加
* @param bathArgs
*/
void bathAddList(List<Object[]> bathArgs);
- BookDaoImp 接口实现类
@Override
public void bathAddList(List<Object[]> bathArgs) {
   //创建SQL语句
   String sql = "insert into book values (?,?,?)";
   //调用方法实现
   int[] insts = jdbcTemplate.batchUpdate(sql, bathArgs);
   System.out.println("批量添加成功"+ Arrays.toString(insts));
}
- TestJdbcTemplate 测试类
@Test
public void TestBatchAdd() {
   ApplicationContext context = new ClassPathXmlApplicationContext("database-connect.xml");
   BookService bookService = context.getBean("bookService", BookService.class);
   //准备List<Object>数据
   List<Object[]> bathArgs = new ArrayList<>();
   Object[] o1 = {3, "聊斋", "正常"};
   Object[] o2 = {4,"坏蛋是怎么炼成的","禁止"};
   Object[] o3 = {5,"人生","正常"};
   bathArgs.add(o1);
   bathArgs.add(o2);
   bathArgs.add(o3);
   //调用批量添加
   bookService.bathAdd(bathArgs);
}
JdbcTemplate 实现批量编辑/删除
- BookService 类
/**
* 批量修改
*/
public void bathUpdata(List<Object[]> bathArgs) {
   bookDao.bathUpdataList(bathArgs);
}

/**
* 批量删除
*/
public void batchDelete(List<Object[]> bathArgs) {
   bookDao.batchDelete(bathArgs);
}
- BookDao 接口类
/**
* 批量修改
* @param bathArgs
*/
void bathUpdataList(List<Object[]> bathArgs);

/**
*批量删除
* @param bathArgs
*/
void batchDelete(List<Object[]> bathArgs);
- BookDaoImp 接口实现类
@Override
public void bathUpdataList(List<Object[]> bathArgs) {
   String sql = "update book set book_name=?,status=? where book_id=?";
   int[] inst = jdbcTemplate.batchUpdate(sql, bathArgs);
   System.out.println("批量修改成功" + Arrays.toString(inst));
}

@Override
public void batchDelete(List<Object[]> bathArgs) {
   String sql = "delete from book where book_id=?";
   int[] ints = jdbcTemplate.batchUpdate(sql, bathArgs);
   System.out.println("批量删除" + Arrays.toString(ints));
}
- TestJdbcTemplate 测试类
@Test
public void TestBatchUpdata() {
   ApplicationContext context = new ClassPathXmlApplicationContext("database-connect.xml");
   BookService bookService = context.getBean("bookService", BookService.class);
   //准备List<Object>数据
   List<Object[]> bathArgs = new ArrayList<>();
   Object[] o1 = {"活着", "2", 3};
   Object[] o2 = {"骆驼祥子","0", 4};
   Object[] o3 = {"红楼梦","1", 5};
   bathArgs.add(o1);
   bathArgs.add(o2);
   bathArgs.add(o3);
   //调用批量添加
   bookService.bathUpdata(bathArgs);
}


@Test
public void TestBatchDelete() {
   ApplicationContext context = new ClassPathXmlApplicationContext("database-connect.xml");
   BookService bookService = context.getBean("bookService", BookService.class);
   //准备List<Object>数据
   List<Object[]> bathArgs = new ArrayList<>();

   Object[] o2 = {4};
   Object[] o3 = {5};
   bathArgs.add(o2);
   bathArgs.add(o3);
   //调用批量添加
   bookService.batchDelete(bathArgs);
}
事务管理
什么是事务
- 事务是数据库操作的最基本单元,逻辑上一组操作,要么都成功,如果有一个失败所有操作都会失败
- 典型场景:银行转账(张三给李四转账 100 元,张三少 100 元,李四多 100 元)
事务四个特性(ACID)
- 原子性:如果有一个失败则都失败,要么都成功
- 一致性:操作之前和操作之后总量不变
- 隔离性:多事务操作中不会互相影响
- 持久性:操作后数据库中数据变化
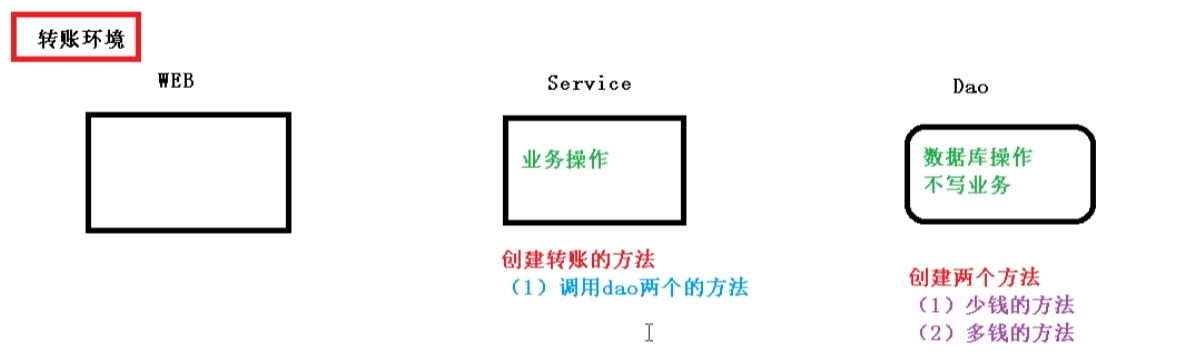
事务操作(搭建事务操作环境)
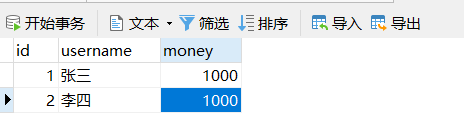
创建数据库表
创建 serivce 搭建 dao,完成对象创建和注入
- 在 service 注入 dao,在 dao 注入 JdbcTemplate,在 JdbcTemplate 注入 DataSouce
- service 注入 dao
@Service public class AccountService { /** * 注入Dao */ @Autowired private AccountDao accountDao; }- dao 注入 JdbcTemplate
@Repository public class AccountDaoImp implements AccountDao{ @Autowired private JdbcTemplate jdbcTemplate; }- JdbcTemplate 注入 DataSouce
<?xml version="1.0" encoding="UTF-8"?>
<beans xmlns="http://www.springframework.org/schema/beans"
      xmlns:xsi="http://www.w3.org/2001/XMLSchema-instance"
      xmlns:context="http://www.springframework.org/schema/context"
      xsi:schemaLocation="http://www.springframework.org/schema/beans http://www.springframework.org/schema/beans/spring-beans.xsd
                           http://www.springframework.org/schema/context http://www.springframework.org/schema/context/spring-context.xsd">

   <!--引入外部属性文件-->
   <context:property-placeholder location="jdbc.properties"/>
   <!--数据库地址池,完成对数据库的连接工作时所需要的数据-->
   <bean id="dataSource" class="com.alibaba.druid.pool.DruidDataSource">
      <property name="driverClassName" value="${prop.driverClass}"></property>
      <property name="url" value="${prop.url}"></property>
      <property name="username" value="${prop.userName}"></property>
      <property name="password" value="${prop.password}"></property>
   </bean>
   <!--通过调用jdbcTemplate和上面地址池配置的数据库连接配置,实现对MySQL数据库的连接-->
   <bean id="jdbcTemplate" class="org.springframework.jdbc.core.JdbcTemplate">
      <!--通过查看源码发现,JdbcTemplate继承自JdbcAccessor类,创建JdbcTemplate对象时会将DataSource对象通过有参构造传入,
      然后通过调用set方法来将传入的DataSource对象赋值给JdbcAccessor类中的DataSource类型属性-->
      <property name="dataSource" ref="dataSource"></property>
   </bean>

   <!--service 注入 dao -->
   <!--组件扫描,对注解标记符进行搜索,完成对类对象的创建,和属性值的注入-->
   <context:component-scan base-package="com.affair"></context:component-scan>

</beans>
在 dao 创建两个方法,多钱方法和少钱方法,在 service 创建转账的方法
- dao 中
@Repository public class AccountDaoImp implements AccountDao{ @Autowired private JdbcTemplate jdbcTemplate; @Override public void addMoney() { String sql = "update t_account set money=money+? where username=?"; jdbcTemplate.update(sql, 100, "李四"); } @Override public void reduceMoney() { // 张三转账100给李四 String sql = "update t_account set money=money-? where username=?"; jdbcTemplate.update(sql, 100, "张三"); } }- 在 service 中
@Service
public class AccountService {
 /**
  * 注入Dao
  */
 @Autowired
 private AccountDao accountDao;


 //转账方法
 public void accountMoney() {
     // 张三少100
     accountDao.reduceMoney();
     // 李四多100
     accountDao.addMoney();
 }
}
以上代码如果正常执行没有问题,但是如果执行中出现异常,则会有问题
 上述异常,破坏了数据的一致性,操作之前和操作之后总量发生了变化,通过事务可以进行解决 4.1 事务操作过程
//转账方法
public void accountMoney() {
   try {
      //第一步 开启事务

      //第二步 进行业务操作

      // 张三少100
      accountDao.reduceMoney();
      //模拟异常
      int i = 10/0;
      // 李四多100
      accountDao.addMoney();

      //第三步 没有发生异常,提交事务
   } catch (Exception e) {
      //第四步 出现异常 事务回滚

   }
}
事务操作(Spring 事务管理介绍)
- 事务添加到 JavaEE 三层结构里面 Service 层(业务逻辑层)
- 在 Spring 进行事务管理操作
- 两种方式:编程式事务管理(不常用)和声明式事务管理(常用)
- 声明式事务管理
- 基于注解方式(常用)
- 基于 xml 配置文件方式
- 在 Spring 进行声明式事务管理,底层使用 AOP
- Spring 事务管理 API
- 提供一个接口,代表事务管理器,这个接口针对不同框架实现了不同的实现类
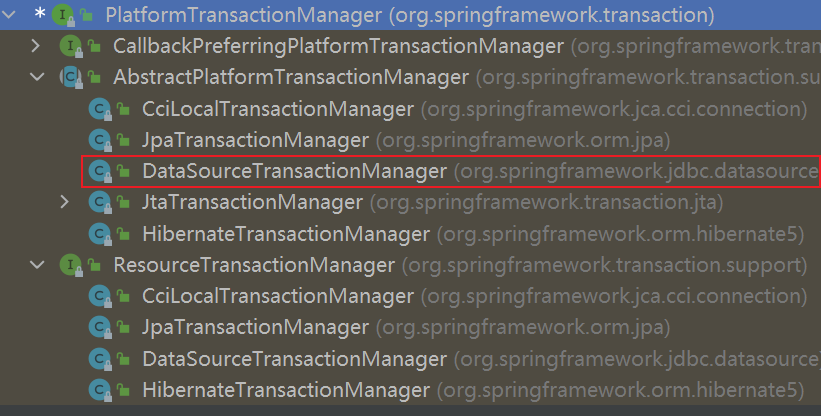
- 提供一个接口,代表事务管理器,这个接口针对不同框架实现了不同的实现类
事务管理(注解声明式事务管理)
- 在 spring 配置文件中,配置事务管理器
<!--创建事务管理器-->
<bean id="TransactionManager" class="org.springframework.jdbc.datasource.DataSourceTransactionManager">
   <!--注入数据源-->
   <property name="dataSource" ref="dataSource"></property>
</bean>
- 在 spring 配置文件中,开启事务注解
- 在 spring 配置文件中引入命名空间 tx
<?xml version="1.0" encoding="UTF-8"?> <beans xmlns="http://www.springframework.org/schema/beans" xmlns:xsi="http://www.w3.org/2001/XMLSchema-instance" xmlns:context="http://www.springframework.org/schema/context" xmlns:aop="http://www.springframework.org/schema/aop" xmlns:tx="http://www.springframework.org/schema/tx" xsi:schemaLocation="http://www.springframework.org/schema/beans http://www.springframework.org/schema/beans/spring-beans.xsd http://www.springframework.org/schema/context http://www.springframework.org/schema/context/spring-context.xsd http://www.springframework.org/schema/aop http://www.springframework.org/schema/aop/spring-aop.xsd http://www.springframework.org/schema/tx http://www.springframework.org/schema/tx/spring-tx.xsd"> </beans>- 开启事务注解
<!--开启事务注解--> <tx:annotation-driven transaction-manager="TransactionManager"></tx:annotation-driven> - 在 service 类上面(获取 service 类里面方法上面)添加事务注解
- @Transactional 注解可以添加到类上,也可以添加到方法上
- @Transactional 注解添加类上面,对应类里面的方法都添加事务
- @Transactional 注解添加到方法上面,对应方法添加事务
@Service
@Transactional
public class AccountService {}
- 执行测试类,执行异常,事务回滚,金额不变化
@Test
public void testAffair() {
   ApplicationContext context = new ClassPathXmlApplicationContext("affair-database-connect.xml");
   AccountService accountService = context.getBean("accountService", AccountService.class);
   accountService.accountMoney();
}
事务管理(声明式事务管理参数配置)
propagation 事务的传播行为
当一个事务方法被另外一个事务方法调用时,这个事务方法如何进行
@Service
@Transactional(propagation = Propagation.REQUIRED)
public class AccountService {}
isolation 事务的隔离级别
- 事务独有特性称为隔离性,多事务操作之前不会产生影响,不考虑隔离性产生很多问题
- 三个读的问题:脏读、不可重复读、虚(幻)读
- 脏读:多个事务之间,一个未提交的事务读取到另一个未提交的事务
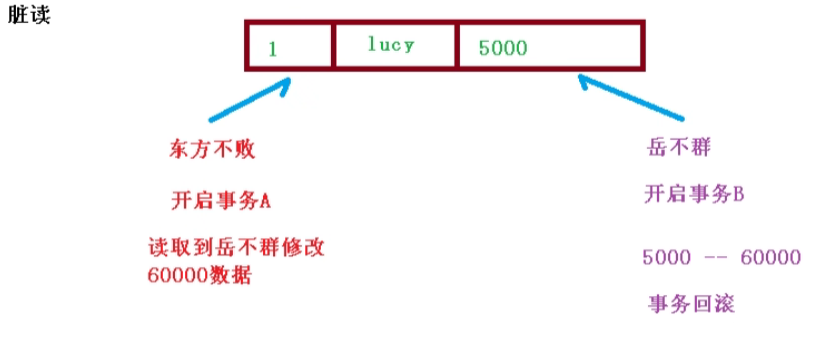
- 不可重复读:一个未提交事务读取到另一个提交事务修改数据
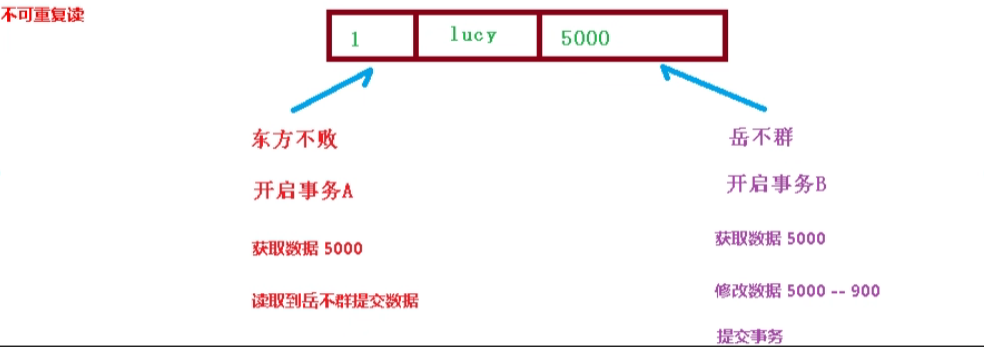
- 虚读:一个未提交事务读取到另一个提交事务添加数据
- 脏读:多个事务之间,一个未提交的事务读取到另一个未提交的事务
- 解决:通过设置事务隔离性,解决问题

@Service
@Transactional(propagation = Propagation.REQUIRED, isolation = Isolation.REPEATABLE_READ)
public class AccountService {}
timetout 超时时间
- 事务需要在一定时间内提交,如果不提交,超时后进行回滚
- 默认值是 -1 不超时,设置时间以秒为单位
@Service
@Transactional(timeout = 10,propagation = Propagation.REQUIRED, isolation = Isolation.REPEATABLE_READ)
public class AccountService {}
readOnly 是否只读
- 读:查询操作,写:添加、修改、删除操作
- readOnly 默认值为 false 表示可以查询,可以添加修改删除操作
- readOnly 设置值为 true,只能查询
@Service
@Transactional(readOnly = false,timeout = 10)
public class AccountService {}
rollbackFor 回滚
设置出现哪些异常进行事务回滚
noRollbakcFor 不回滚
设置出现哪些异常不进行事务回滚
Spring 事务传播行为一共有 7 种类型,主要分为 3 类
| 类型 | 传播属性 | 描述 |
|---|---|---|
| 支持当前事物 | PROPAGATION_REQUIRED | 如果当前没有事物,就新建一个事务;如果有事物,就直接使用当前前事物 |
| 支持当前事物 | PROPAGATION_SUPPORTS | 如果当前没有事务,就以非事务方式执行 |
| 支持当前事物 | PROPAGATION_MANDATORY | 如果当前没有事务,就抛出异常 |
| 不支持当前事物 | PROPAGATION_REQUIRES_NEW | 如果当前有事物,就将当前前事物挂起,新建一个事物 |
| 不支持当前事物 | PROPAGATION_NOT_SUPPORTED | 如果有事务,就将当前前事物挂起,并以非事务方式执行 |
| 不支持当前事物 | PROPAGATION_NEVER | 如果有事物,就抛异常,即必须以非事务方式执行 |
| 奇葩类型-支持当前事物的特例 | PROPAGATION_NESTED | 如果有事物,也新建一个事务,以事务嵌套事物的方式执行 |
事务操作(XML 声明式事务管理)
在 spring 配置文件中进行配置
- 第一步:配置事务管理
- 第二步:配置通知
- 第三步:配置切入点和切面
<?xml version="1.0" encoding="UTF-8"?>
<beans xmlns="http://www.springframework.org/schema/beans"
       xmlns:xsi="http://www.w3.org/2001/XMLSchema-instance"
       xmlns:context="http://www.springframework.org/schema/context"
       xmlns:aop="http://www.springframework.org/schema/aop"
       xmlns:tx="http://www.springframework.org/schema/tx"
       xsi:schemaLocation="http://www.springframework.org/schema/beans http://www.springframework.org/schema/beans/spring-beans.xsd
                           http://www.springframework.org/schema/context http://www.springframework.org/schema/context/spring-context.xsd
                           http://www.springframework.org/schema/aop http://www.springframework.org/schema/aop/spring-aop.xsd
                           http://www.springframework.org/schema/tx http://www.springframework.org/schema/tx/spring-tx.xsd">

    <!--引入外部属性文件-->
    <context:property-placeholder location="jdbc.properties"/>
    <!--数据库地址池,完成对数据库的连接工作时所需要的数据-->
    <bean id="dataSource" class="com.alibaba.druid.pool.DruidDataSource">
        <property name="driverClassName" value="${prop.driverClass}"></property>
        <property name="url" value="${prop.url}"></property>
        <property name="username" value="${prop.userName}"></property>
        <property name="password" value="${prop.password}"></property>
    </bean>
    <!--通过调用jdbcTemplate和上面地址池配置的数据库连接配置,实现对MySQL数据库的连接-->
    <bean id="jdbcTemplate" class="org.springframework.jdbc.core.JdbcTemplate">
        <!--通过查看源码发现,JdbcTemplate继承自JdbcAccessor类,创建JdbcTemplate对象时会将DataSource对象通过有参构造传入,
        然后通过调用set方法来将传入的DataSource对象赋值给JdbcAccessor类中的DataSource类型属性-->
        <property name="dataSource" ref="dataSource"></property>
    </bean>

    <!--service 注入 dao -->
    <!--组件扫描,对注解标记符进行搜索,完成对类对象的创建,和属性值的注入-->
    <context:component-scan base-package="com.affair"></context:component-scan>

    <!--1.创建事务管理器-->
    <bean id="TransactionManager" class="org.springframework.jdbc.datasource.DataSourceTransactionManager">
        <!--注入数据源-->
        <property name="dataSource" ref="dataSource"></property>
    </bean>
    <!--2.配置通知-->
    <tx:advice id="txadvice">
        <!--配置事务参数-->
        <tx:attributes>
            <!--指定那种规则的方法上面添加事务-->
            <!--name值为方法名字-->
            <tx:method name="accountMoney" propagation="REQUIRED"/>
            <!--用*表示方法名以account开头的所有方法都会添加事务-->
            <!--<tx:method name="account*"/>-->
        </tx:attributes>
    </tx:advice>
    <!--3.配置切入点和切面-->
    <aop:config>
        <!--配置切入点-->
        <aop:pointcut id="pt" expression="execution(* com.affair.service.AccountService.*(..))"/>
        <!--配置切面:给事务通知设置到pt-->
        <aop:advisor advice-ref="txadvice" pointcut-ref="pt" ></aop:advisor>
    </aop:config>

</beans>
编写测试用例
@Test
public void testAffairXml() {
   ApplicationContext context = new ClassPathXmlApplicationContext("affair-bean.xml");
   AccountService accountService = context.getBean("accountService", AccountService.class);
   accountService.accountMoney();
}
事务操作(完全注解方式-声明式事务管理)
- 创建配置类,使用配置类代替 xml 配置文件
package com.affair.fonfig;

import com.alibaba.druid.pool.DruidDataSource;
import org.springframework.context.annotation.Bean;
import org.springframework.context.annotation.ComponentScan;
import org.springframework.context.annotation.Configuration;
import org.springframework.jdbc.core.JdbcTemplate;
import org.springframework.jdbc.datasource.DataSourceTransactionManager;
import org.springframework.transaction.annotation.EnableTransactionManagement;

import javax.sql.DataSource;

@Configuration //配置类
@ComponentScan(basePackages = "com.affair") //开启组件扫描
@EnableTransactionManagement //开启事务注解
public class Config {
    // 创建数据库连接池
    @Bean
    public DruidDataSource getDruidDataSource() {
        DruidDataSource dataSource = new DruidDataSource();
        dataSource.setDriverClassName("com.mysql.jdbc.Driver");
        dataSource.setUrl("jdbc:mysql://localhost:3306/mydb");
        dataSource.setUsername("root");
        dataSource.setPassword("root");
        return dataSource;
    }

    //创建JdbcTemplate 对象
    public JdbcTemplate getJdbcTemplate(DataSource dataSource) {
        //到ioc容器中根据类型找到 dataSource
        JdbcTemplate jdbcTemplate = new JdbcTemplate();
        //注入dataSource
        jdbcTemplate.setDataSource(dataSource);
        return jdbcTemplate;
    }

    //创建事务管理器
    @Bean
    public DataSourceTransactionManager getDataSourceTransactionManager(DataSource data) {
        DataSourceTransactionManager transactionManager = new DataSourceTransactionManager();
        transactionManager.setDataSource(data);
        return transactionManager;
    }
}
- 在 service 上添加注解
@Service
@Transactional(readOnly = false,timeout = 10,propagation = Propagation.REQUIRED, isolation = Isolation.REPEATABLE_READ)
public class AccountService {}
- 编写测试类
@Test
public void testAffairConfig() {
   ApplicationContext context = new AnnotationConfigApplicationContext(Config.class);
   AccountService accountService = context.getBean("accountService", AccountService.class);
   accountService.accountMoney();
}
Spring 5 新特性
- 整个 Spring5 框架的代码基于 Java8 运行时兼容 JDK9,许多不建议使用的类和方法在代码中删除
- Spring5.0 框架自带了通用的日志封装
- Spring5 移除了 Log4jConfigListener 官方建议使用 Log4j2
- Spring5 框架整合了 Log4j2
- 引入 jar 包
- 创建 log4j2.xml 文件,添加内容
<?xml version="1.0" encoding="UTF-8"?> <!--日志级别以及优先级排序: OFF > FATAL > ERROR > WARN > INFO > DEBUG > TRACE > ALL --> <!--Configuration后面的status用于设置log4j2自身内部的信息输出,可以不设置,当设置成trace时,可以看到log4j2内部各种详细输出--> <configuration status="INFO"> <!--先定义所有的appender--> <appenders> <!--输出日志信息到控制台--> <console name="Console" target="SYSTEM_OUT"> <!--控制日志输出的格式--> <PatternLayout pattern="%d{yyyy-MM-dd HH:mm:ss.SSS} [%t] %-5level %logger{36} - %msg%n"/> </console> </appenders> <!--然后定义logger,只有定义了logger并引入的appender,appender才会生效--> <!--root:用于指定项目的根日志,如果没有单独指定Logger,则会使用root作为默认的日志输出--> <loggers> <root level="info"> <appender-ref ref="Console"/> </root> </loggers> </configuration> - Spring5 框架核心容器部分支持 @Nullable 注解
- @Nullable 注解,可以在方法,属性,参数上使用,表示方法返回为空,属性值可以为空,参数值可以为空
- Spring5 核心容器支持函数式风格 GenericApplicationContext
// 创建 User 类
public class User {
}
// 创建测试
@Test
   public void TestGenericApplictionContext() {
   // 1.创建GenericApplicationContext对象
   GenericApplicationContext genericApplicationContext = new GenericApplicationContext();
   //2.调用genericApplicationContext的对象方法注册
   genericApplicationContext.refresh();
   //使用Lambda表达式 语法:() -> {Lambda体}
   //genericApplicationContext.registerBean(User.class, () -> new User());
   ////3.获取在Spring 注册的对象,参数:包名.类名
   //User user = (User)genericApplicationContext.getBean("com.test.User");
   //System.out.println("User"+user);

   //通过指定名字,使用Lambda表达式 语法:() -> {Lambda体}
   genericApplicationContext.registerBean("user1",User.class, () -> new User());
   //3.获取在Spring 注册的对象,通过指定名字获取
   User user = (User)genericApplicationContext.getBean("user1");
   System.out.println("User"+user);
}
Spring 在测试方面的改进 Junit5
使用 Junit4
- 引入 jar 包 spring-test-5.2.6.RELEASE.jar
- 创建测试类,使用注解方式完成测试
 import org.junit.Test;
 import org.junit.runner.RunWith;
 import org.springframework.beans.factory.annotation.Autowired;
 import org.springframework.test.context.ContextConfiguration;
 import org.springframework.test.context.junit4.SpringJUnit4ClassRunner;


 @RunWith(SpringJUnit4ClassRunner.class) // 指定单元测试版本
 @ContextConfiguration("classpath:bean1.xml") //指定配置文件路径
 public class JTest4 {
    @Autowired //注入
    private User user;

    //编写测试
    @Test
    public void test1 () {
       user.login();
    }
 }
使用 Junit5
- 引入 Junit4 测试包
- 创建测试类,使用注解完成测试
 import org.junit.jupiter.api.Test;
 import org.junit.jupiter.api.extension.ExtendWith;
 import org.springframework.beans.factory.annotation.Autowired;
 import org.springframework.test.context.ContextConfiguration;
 import org.springframework.test.context.junit.jupiter.SpringExtension;
 import org.springframework.test.context.junit.jupiter.SpringJUnitConfig;


 //@ExtendWith(SpringExtension.class) // 指定单元测试版本
 //@ContextConfiguration("classpath:bean1.xml") //指定配置文件路径
 @SpringJUnitConfig(locations = "classpath:bean1.xml")//简化写法
 public class JTest5 {
    @Autowired //注入
    private User user;

    @Test
    public void test1() {
       user.login();
    }
 }
Webflux
学习 Webflux 需要前置知识点:
- SpringMVC
- SpringBoot
- Maven
- Java8 新特性
后续...学完以上再回来学......
相关资源
Spring 历史版本下载 https://repo.spring.io/ui/native/libs-release/org/springframework/spring/
日志包 https://commons.apache.org/proper/commons-logging/download_logging.cgi
选择下载文件

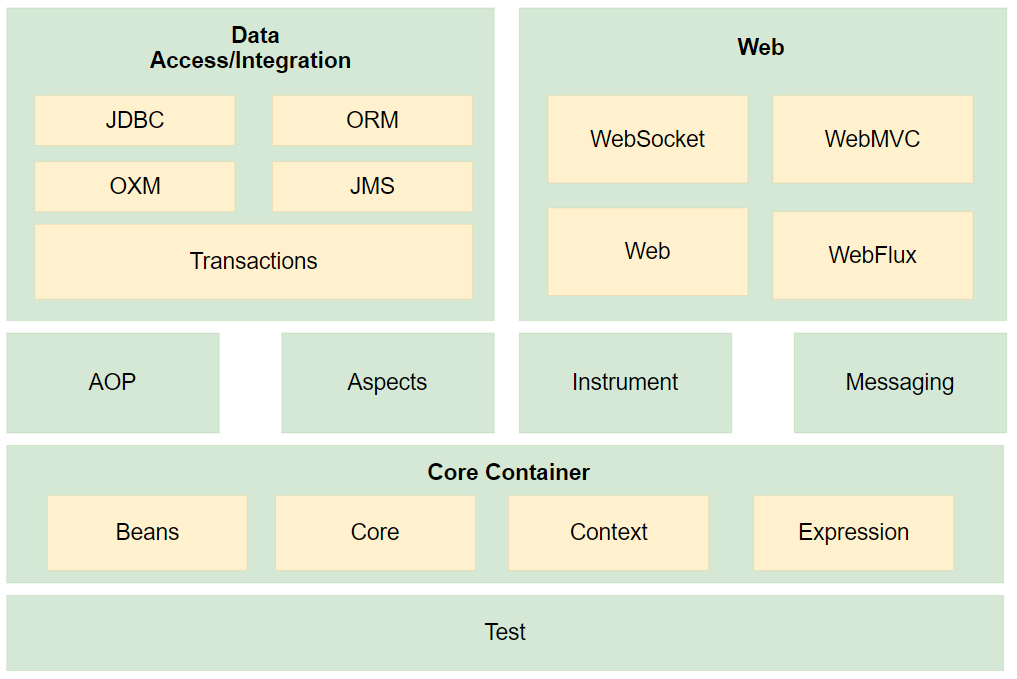
image-20220527094342675 Spring 5 模块