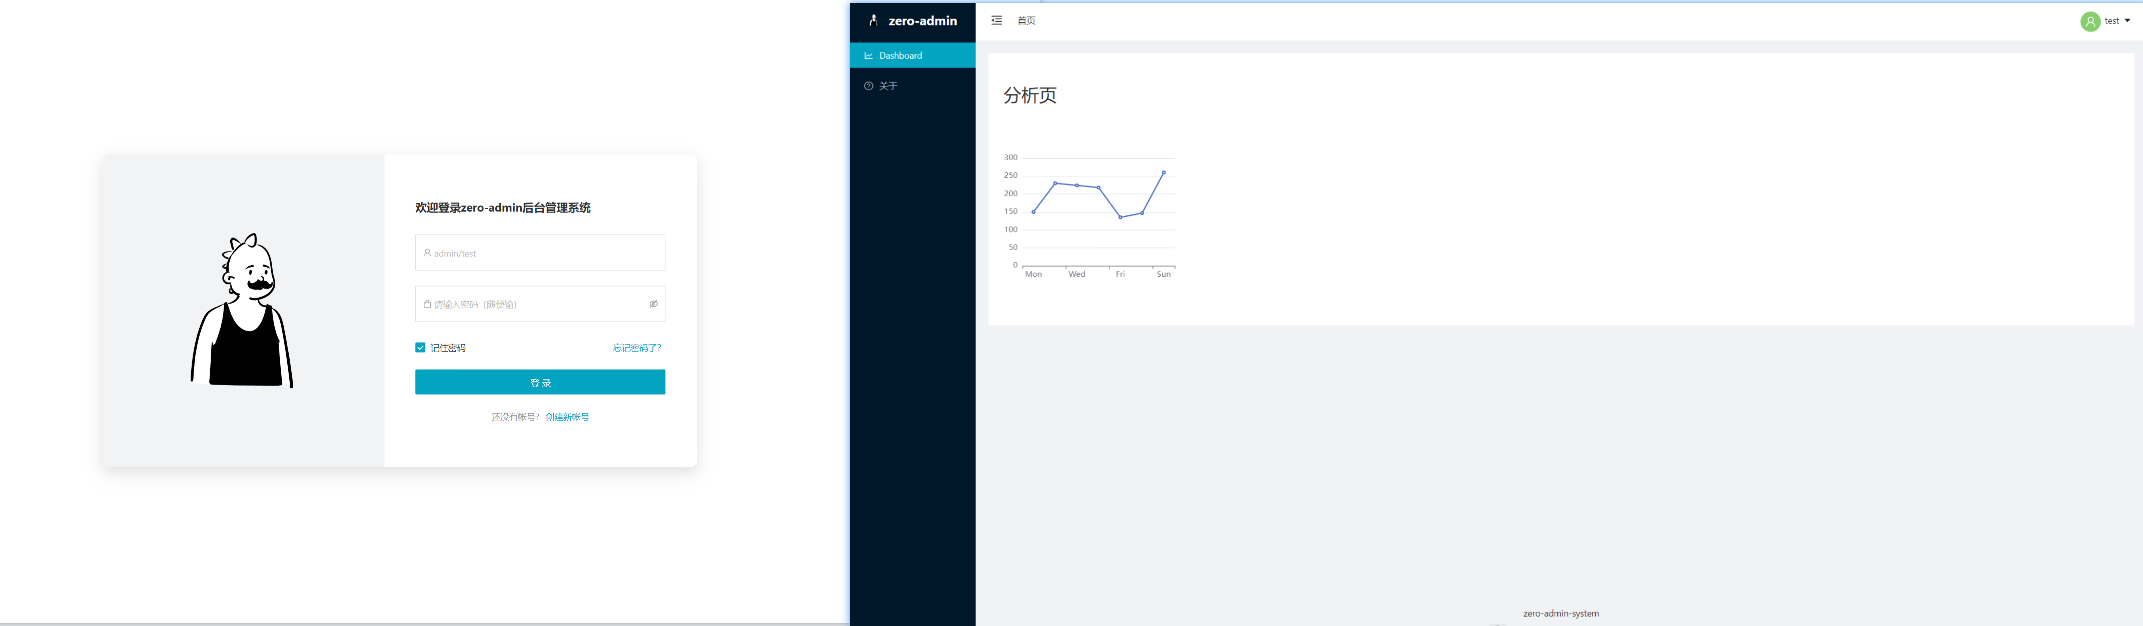
zero-admin后台管理模板
zero-admin
zero-admin 是一个后台前端解决方案,它基于 vue3 和 ant-design-vue 实现。它使用了最新的前端技术栈【vue3+vue-router+typescript+axios+ant-design-vue+pinia+mockjs+plopjs+vite+Vitest】实现了动态路由、权限验证;自定义 Vue 指令封装;规范项目代码风格;项目内置脚手架解决文件创建混乱,相似业务模块需要频繁拷贝代码或文件问题;Echarts 图形库进行封装;axios 请求拦截封装,请求 api 统一管理;通过 mockjs 模拟数据;对生产环境构建进行打包优化,实现了打包 gzip 压缩、代码混淆,去除 console 打印,打包体积分析等;提炼了典型的业务模型,提供了丰富的功能组件,它可以帮助你快速搭建企业级中后台产品原型
推荐 VsCode 编辑器插件
VSCode + Volar (并禁用 Vetur 扩展插件) + TypeScript Vue Plugin (Volar).
TS 中.vue导入的类型支持
默认情况下,TypeScript 无法处理“.vue”导入的类型信息,因此我们将“tsc”CLI 替换为“vue-tsc”进行类型检查。在编辑中,我们需要 TypeScript Vue Plugin (Volar) 以使 TypeScript 语言服务了解“.vue”类型。
如果你觉得独立的 TypeScript 插件不够快,Volar 还实现了一个 Take Over Mode that 这更有表现力。您可以通过以下步骤启用它:
- Disable the built-in TypeScript Extension
- Run
Extensions: Show Built-in Extensionsfrom VSCode's command palette - Find
TypeScript and JavaScript Language Features, right click and selectDisable (Workspace)
- Run
- Reload the VSCode window by running
Developer: Reload Windowfrom the command palette.
项目获取
git clone https://gitee.com/zmmlet/zero-admin.git
自定义 Vite 配置
项目依赖安装
pnpm install
开发环境运行(编译和热重新加载)
pnpm dev
打包部署运行(生产打包添加类型检查、编译)
pnpm build
运行单元测试 Vitest
pnpm test:unit
语法规则和代码风格检查 ESLint
pnpm lint
功能列表
项目创建
- 项目创建命令 pnpm create vite
- 选择对应初始配置项
Progress: resolved 1, reused 1, downloaded 0, added 1, done
√ Project name: ... zero-admin
√ Select a framework: » Vue
√ Select a variant: » Customize with create-vue ↗
Packages: +1

Vue.js - The Progressive JavaScript Framework

√ Add TypeScript? ... No / Yes
√ Add JSX Support? ... No / Yes
√ Add Vue Router for Single Page Application development? ... No / Yes
√ Add Pinia for state management? ... No / Yes
√ Add Vitest for Unit Testing? ... No / Yes
√ Add an End-to-End Testing Solution? » No
√ Add ESLint for code quality? ... No / Yes
√ Add Prettier for code formatting? ... No / Yes

Scaffolding project in D:\learningSpace\code\vue-project\zero-admin...

Done. Now run:

cd zero-admin
pnpm install
pnpm lint
pnpm dev
初始项目依赖安装
pnpm add ant-design-vue --savepnpm add unplugin-vue-components -Dpnpm add axiospnpm add sass-loader@7.2.0 sass@1.22.10 -Dpnpm add less -D
配置项目代码风格 .prettierrc.json
{
  "stylelintIntegration": true,
  "eslintIntegration": true,
  "printWidth": 80, //单行长度
  "tabWidth": 2, //缩进长度
  "useTabs": false, //使用空格代替tab缩进
  "semi": true, //句末使用分号
  "singleQuote": false, //使用单引号
  "endOfLine": "auto"
}
配置保存(Ctrl + s)自动格式化代码
在项目中创建.vscode 文件夹中创建 setting.json 文件
{
  "editor.codeActionsOnSave": {
    "source.fixAll": true
  },
  "editor.formatOnSave": true,
  "editor.defaultFormatter": "esbenp.prettier-vscode",
  "[vue]": {
    "editor.defaultFormatter": "esbenp.prettier-vscode"
  } // 默认格式化工具选择prettier
}
添加 SCSS 到项目进行 CSS 预处理
pnpm add sass-loader@7.2.0 sass@1.22.10 -D新建
styles/scss文件夹,新建index.scss文件在
vite.config.ts文件中配置
css: {
  preprocessorOptions: {
    // 配置 scss 预处理
    scss: {
      additionalData: '@import "@/style/scss/index.scss";',
    },
  },
},
项目根目录新建 jsconfig.json 文件
配置 vscode 别名跳转规则
{
  "compilerOptions": {
    "emitDecoratorMetadata": true,
    "experimentalDecorators": true,
    "baseUrl": ".",
    "jsx": "react",
    "paths": {
      "@/*": ["./src/*"],
      "@components/*": ["./src/components/*"],
      "@setting/*": ["./src/setting/*"],
      "@views/*": ["./src/views/*"],
      "@assets/*": ["./src/assets/*"],
      "@config/*": ["./src/config/*"],
      "@api/*": ["./src/api/*"],
      "@utils/*": ["./src/utils/*"],
      "@styles/*": ["./src/styles/*"],
      "@store/*": ["./src/store/*"]
    }
  },
  "exclude": ["node_modules", "dist"]
}
在vite.config.ts 文件中配置对应文件夹别名
resolve: {
  alias: {
    "@": fileURLToPath(new URL("./src", import.meta.url)),
    "@comp": path.resolve(__dirname, "./src/components"),
  },
  extensions: [".mjs", ".js", ".ts", ".jsx", ".tsx", ".json", ".vue"],
},
安装 ant design vue 并配置自动加载
安装 UI 和自动加载插件 pnpm add ant-design-vue --savepnpm add unplugin-vue-components -D 在 vite.config.ts 引入配置
// 引入 ant design vue 按需加载
import Components from "unplugin-vue-components/vite";
import { AntDesignVueResolver } from "unplugin-vue-components/resolvers";
export default defineConfig({
  // 插件
  plugins: [
    vue(),
    // ant design vue 按需加载
    Components({
      resolvers: [AntDesignVueResolver({ importStyle: "less" })],
    }),
  ],
});
配置 less 预处理,并自定义 ant Design Vue UI 主题
安装 pnpm add less -D 在 vite.config.ts 引入配置
export default defineConfig({
  // 插件
  plugins: [
    vue(),
    // ant design vue 按需加载
    Components({
      resolvers: [AntDesignVueResolver({ importStyle: "less" })],
    }),
  ],

  css: {
    preprocessorOptions: {
      // 自定义 ant desing vue 主题样式
      less: {
        modifyVars: {
          "@primary-color": "red",
          "@border-radius-base": "0px", // 组件/浮层圆角
        },
        javascriptEnabled: true,
      },
    },
  },
});
pinia 数据持久化
pnpm add pinia-plugin-persist --save
解决 pinia 使用报错问题
使用
import { userStore } from "@/stores/modules/user";
const usersto = userStore();
console.log("store :>> ", usersto);
报错 
解决方法
import store from "@/stores/index";
import { userStore } from "@/stores/modules/user";
const usersto = userStore(store);
console.log("store :>> ", usersto);
Layout 布局
Axios 封装
pnpm add axios --save
菜单图标动态绑定
- 动态创建
// ICON.ts
import { createVNode } from "vue";
import * as $Icon from "@ant-design/icons-vue";

export const Icon = (props: { icon: string }) => {
  const { icon } = props;
  return createVNode($Icon[icon]);
};
- 引入使用
<template>
  <div class="about">about <Icon :icon="icon" /></div>
</template>
<script lang="ts" setup>
import { Icon } from "@/setting/ICON";
import { ref } from "vue";
const icon = ref("AppstoreOutlined");
</script>
打包 gzip 压缩
// 引入 gzip 压缩
import viteCompression from "vite-plugin-compression";

// https://vitejs.dev/config/
export default defineConfig({
  plugins: [
    vue(),
    vueJsx(),
    // 打包压缩,主要是本地gzip,如果服务器配置压缩也可以
    viteCompression({
      verbose: true,
      disable: false,
      threshold: 10240,
      algorithm: "gzip",
      ext: ".gz",
    }),
  ],
});
server {
  #端口号,不同的程序,复制时,需要修改其端口号
        listen      3031;
  #服务器地址,可以为IP地址,本地程序时,可以设置为localhost
        server_name  localhost;
        client_max_body_size 2G;

    # 开启gzip
        gzip on;
    # 启用gzip压缩的最小文件,小于设置值的文件将不会压缩
        gzip_min_length 1k;
    # gzip 压缩级别,1-9,数字越大压缩的越好,也越占用CPU时间,后面会有详细说明
        gzip_comp_level 1;
    # 进行压缩的文件类型。javascript有多种形式。其中的值可以在 mime.types 文件中找到。
        gzip_types text/html text/plain application/javascript application/x-javascript text/css application/xml text/javascript application/x-httpd-php image/jpeg image/gif image/png application/vnd.ms-fontobject font/ttf font/opentype font/x-woff image/svg+xml;
    # 是否在http header中添加Vary: Accept-Encoding,建议开启
        gzip_vary on;
    # 禁用IE 6 gzip
        gzip_disable "MSIE [1-6]\.";
    # 设置压缩所需要的缓冲区大小
        gzip_buffers 32 4k;
    # 设置gzip压缩针对的HTTP协议版本
        gzip_http_version 1.0;

  #程序所在目录
        root D:/learningSpace/code/vue-project/zero-admin/dist;
        charset utf-8;
            index index.html;

        location / {
            try_files $uri $uri/ /index.html;
        }

        location @rewrites {
            rewrite ^(.+)$ /index.html last;
        }

  #程序映射地址,将【zero-service】改为你程序名称,将【proxy_pass】 改为你自己的后台地址
        location /zero-service {
            proxy_pass http://localhost:9099/zero-service;
            proxy_cookie_path / /zero-service;
        }
    }
代码混淆
pnpm add terser -D
export default defineConfig({
  // 打包配置
  build: {
    chunkSizeWarningLimit: 500, // hunk 大小警告的限制(以 kbs 为单位)
    minify: "terser", // 代码混淆  boolean | 'terser' | 'esbuild' ,当设置为 'terser' 时必须先安装 Terser pnpm add terser -D
  },
});
去除生产环境 console
export default defineConfig({
  // 打包配置
  build: {
    terserOptions: {
      compress: {
        // warnings: false,
        drop_console: true, // 打包时删除console
        drop_debugger: true, // 打包时删除 debugger
        pure_funcs: ["console.log", "console.warn"],
      },
      output: {
        comments: true, // 去掉注释内容
      },
    },
  },
});
打包体积分析插件
- 安装
pnpm add rollup-plugin-visualizer -D - vite.config.ts 配置
传统浏览器兼容性支持
- 安装
pnpm add @vitejs/plugin-legacy -D - 在 vite.config.ts 中配置
import legacyPlugin from "@vitejs/plugin-legacy";
export default ({ command, mode }: ConfigEnv): UserConfig => {
  return {
    plugins: [
      legacyPlugin({
        targets: ["chrome 52"], // 需要兼容的目标列表,可以设置多个
        // additionalLegacyPolyfills: ["regenerator-runtime/runtime"], // 面向IE11时需要此插件
      }),
    ],
  };
};
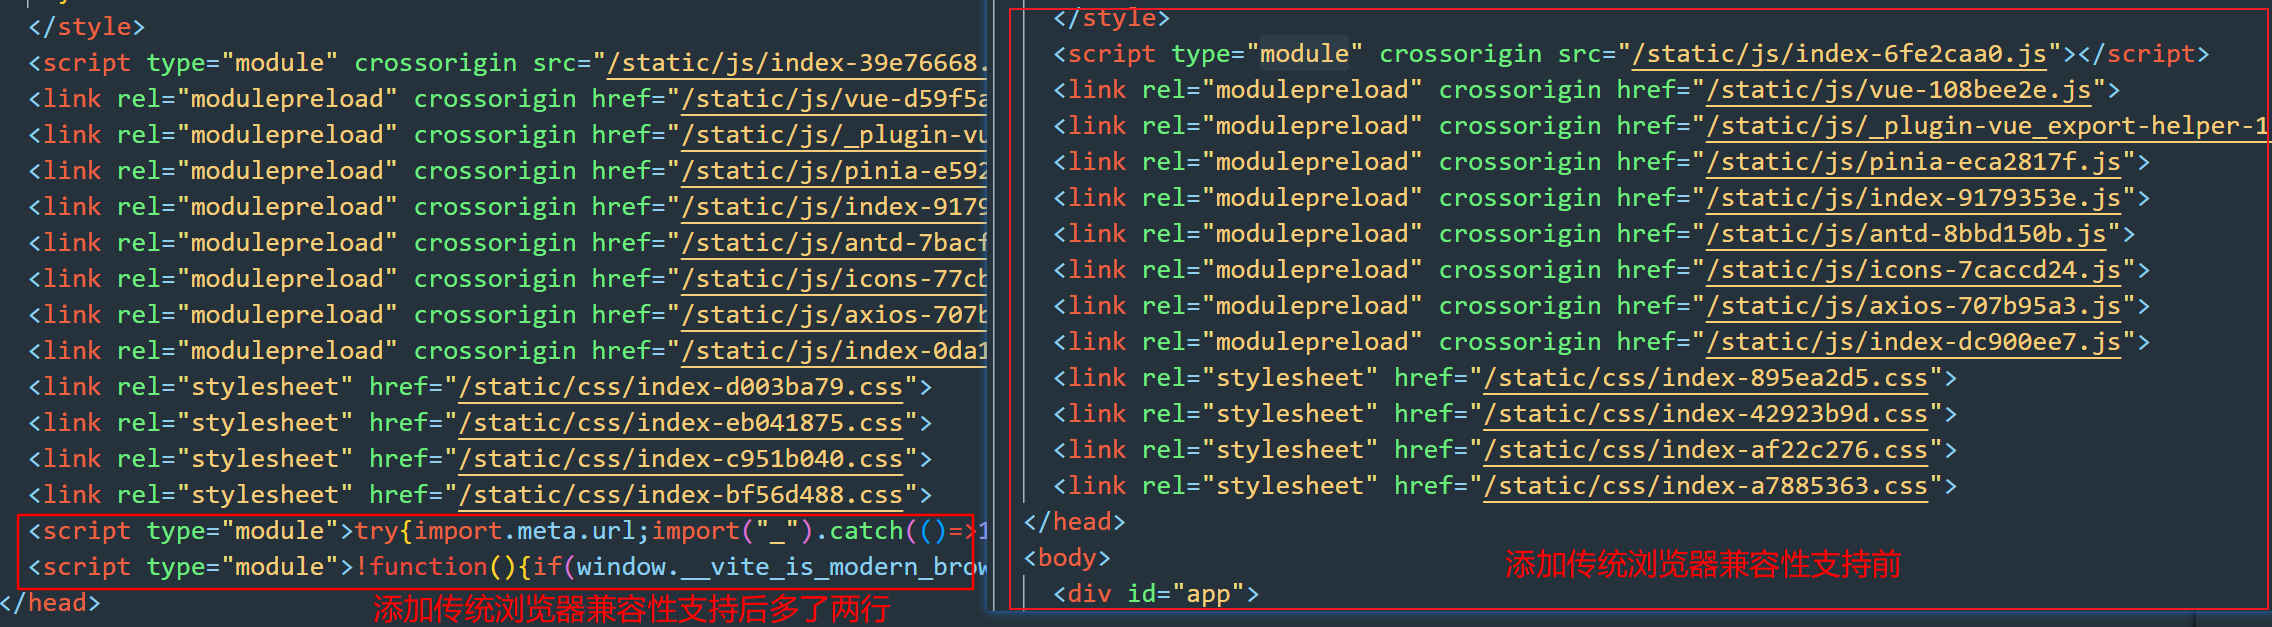
- 添加传统浏览器兼容性支持,打包后在 dist 文件夹下 index.html 文件中确认
CDN 内容分发网络(Content Delivery Network)
- 插件安装
pnpm add vite-plugin-cdn-import -D -w - vite.config.ts 配置
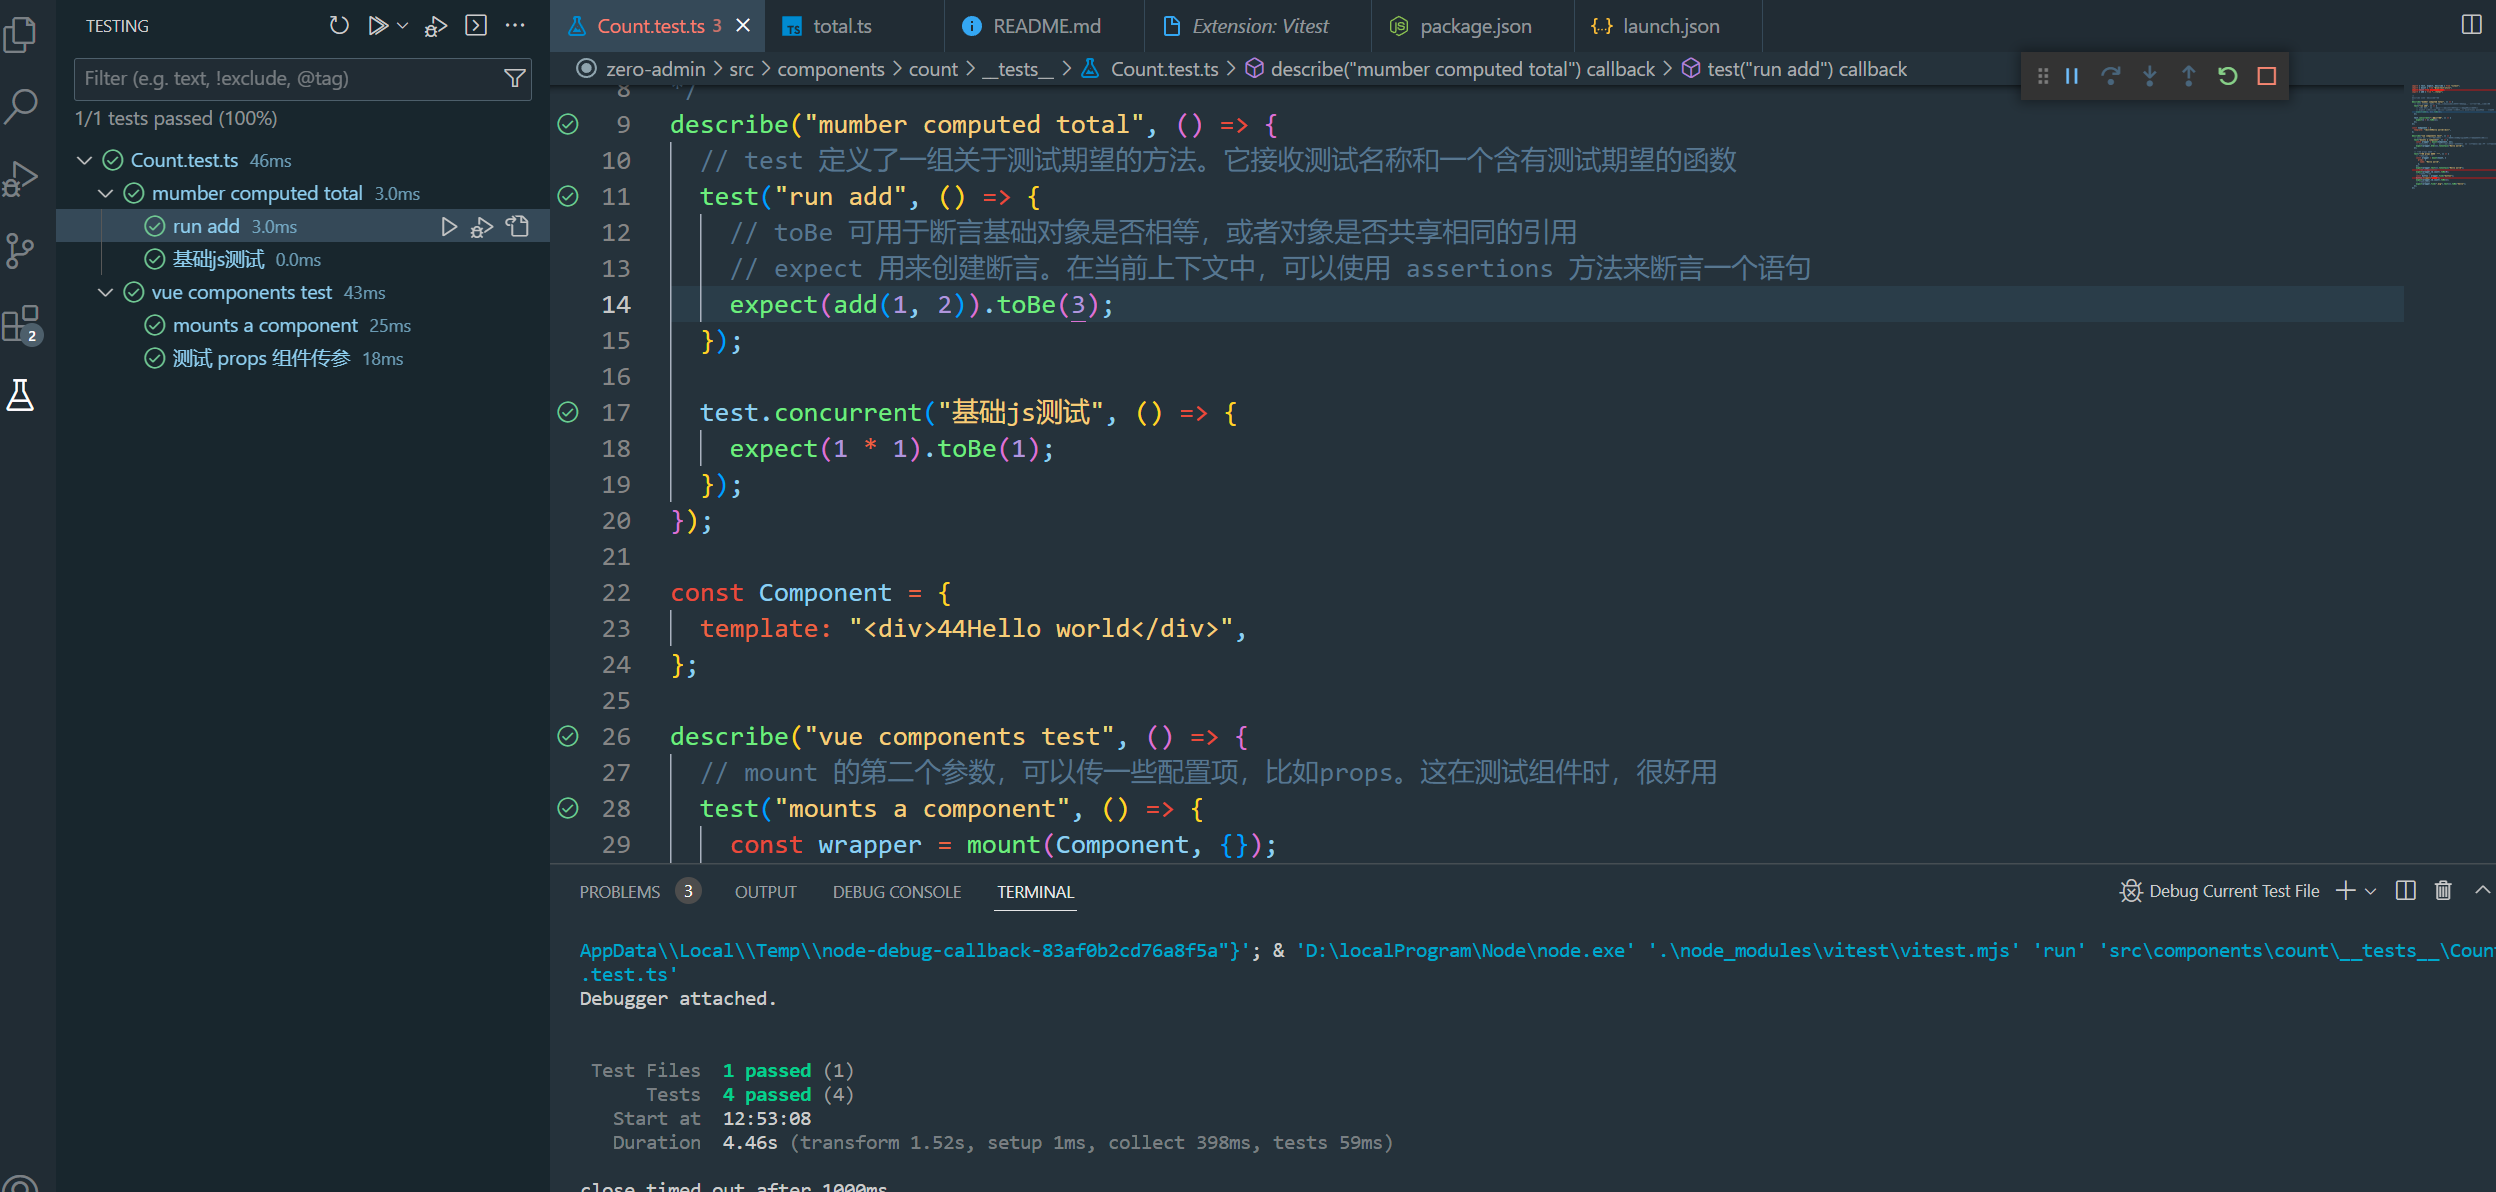
Vitest 单元测试
vitest 参考文章:https://juejin.cn/post/7148371296055722015
- Vitest 测试已经在项目初始化的时候添加
- vue 组件测试
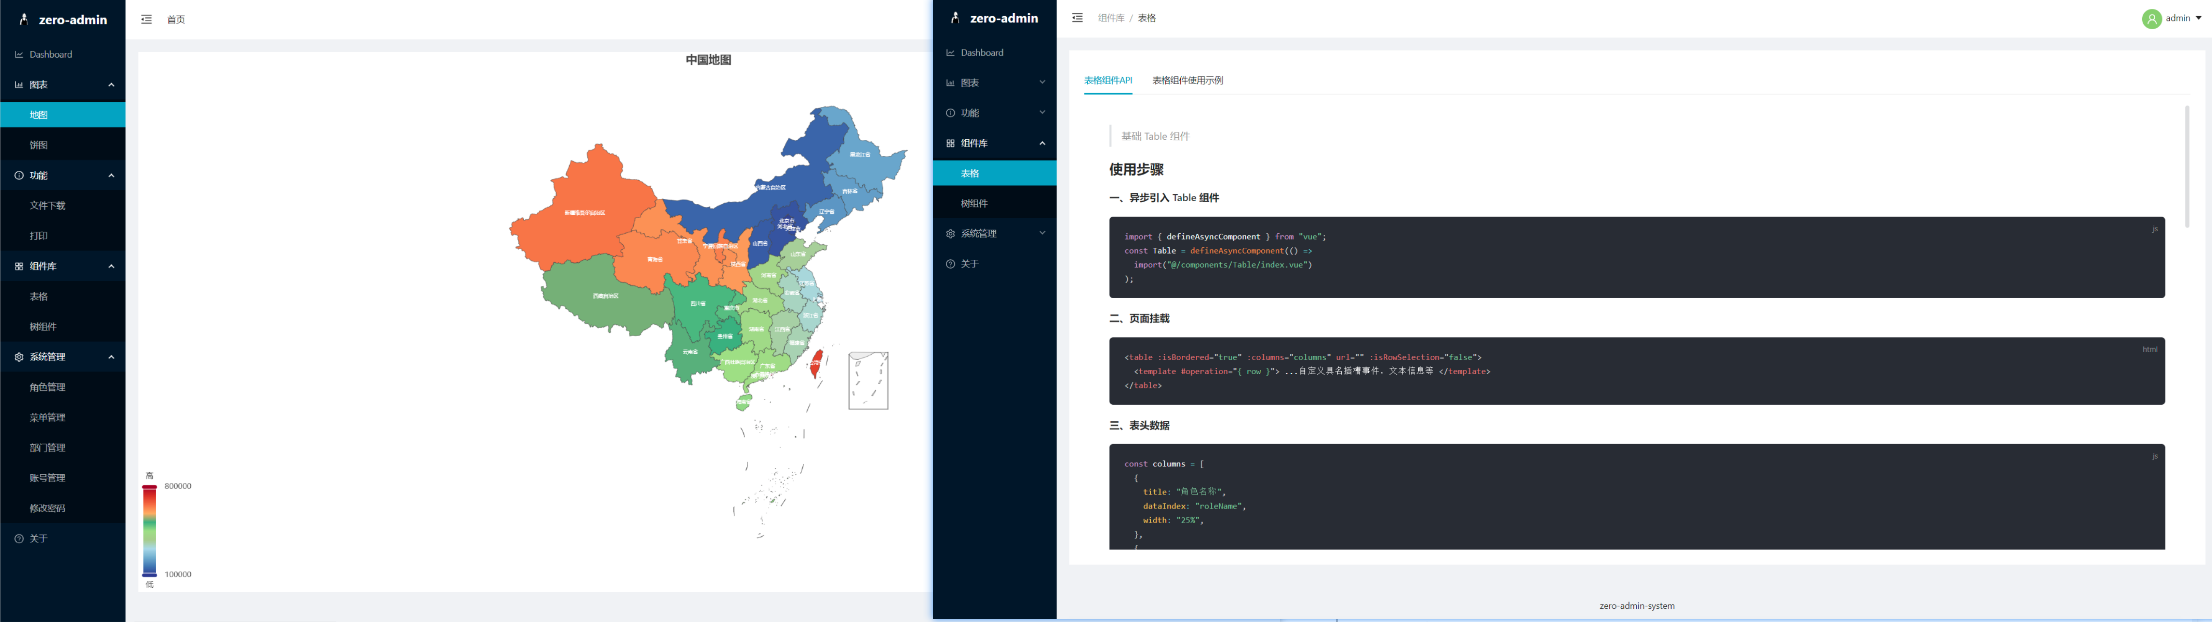
pnpm add @vue/test-utils -D - 测试规则,添加查看
vite.config.ts文件 - 编写 vue 组件
<template>
  <div>
    <div>Count: {{ count }}</div>
    <div>name: {{ props.name }}</div>
    <h2 class="msg">{{ msg }}</h2>
    <button @click="handle">点击事件</button>
  </div>
</template>

<script setup lang="ts">
import { onMounted, ref } from "vue";

const props = defineProps({
  name: {
    type: String,
    default: "1111",
  },
});

const count = ref<number>(0);

let msg = ref<string>("hello");

const handle = () => {
  count.value++;
};

onMounted(() => {
  console.log("props.message==", props.name);
});
</script>

<style scoped lang="scss"></style>
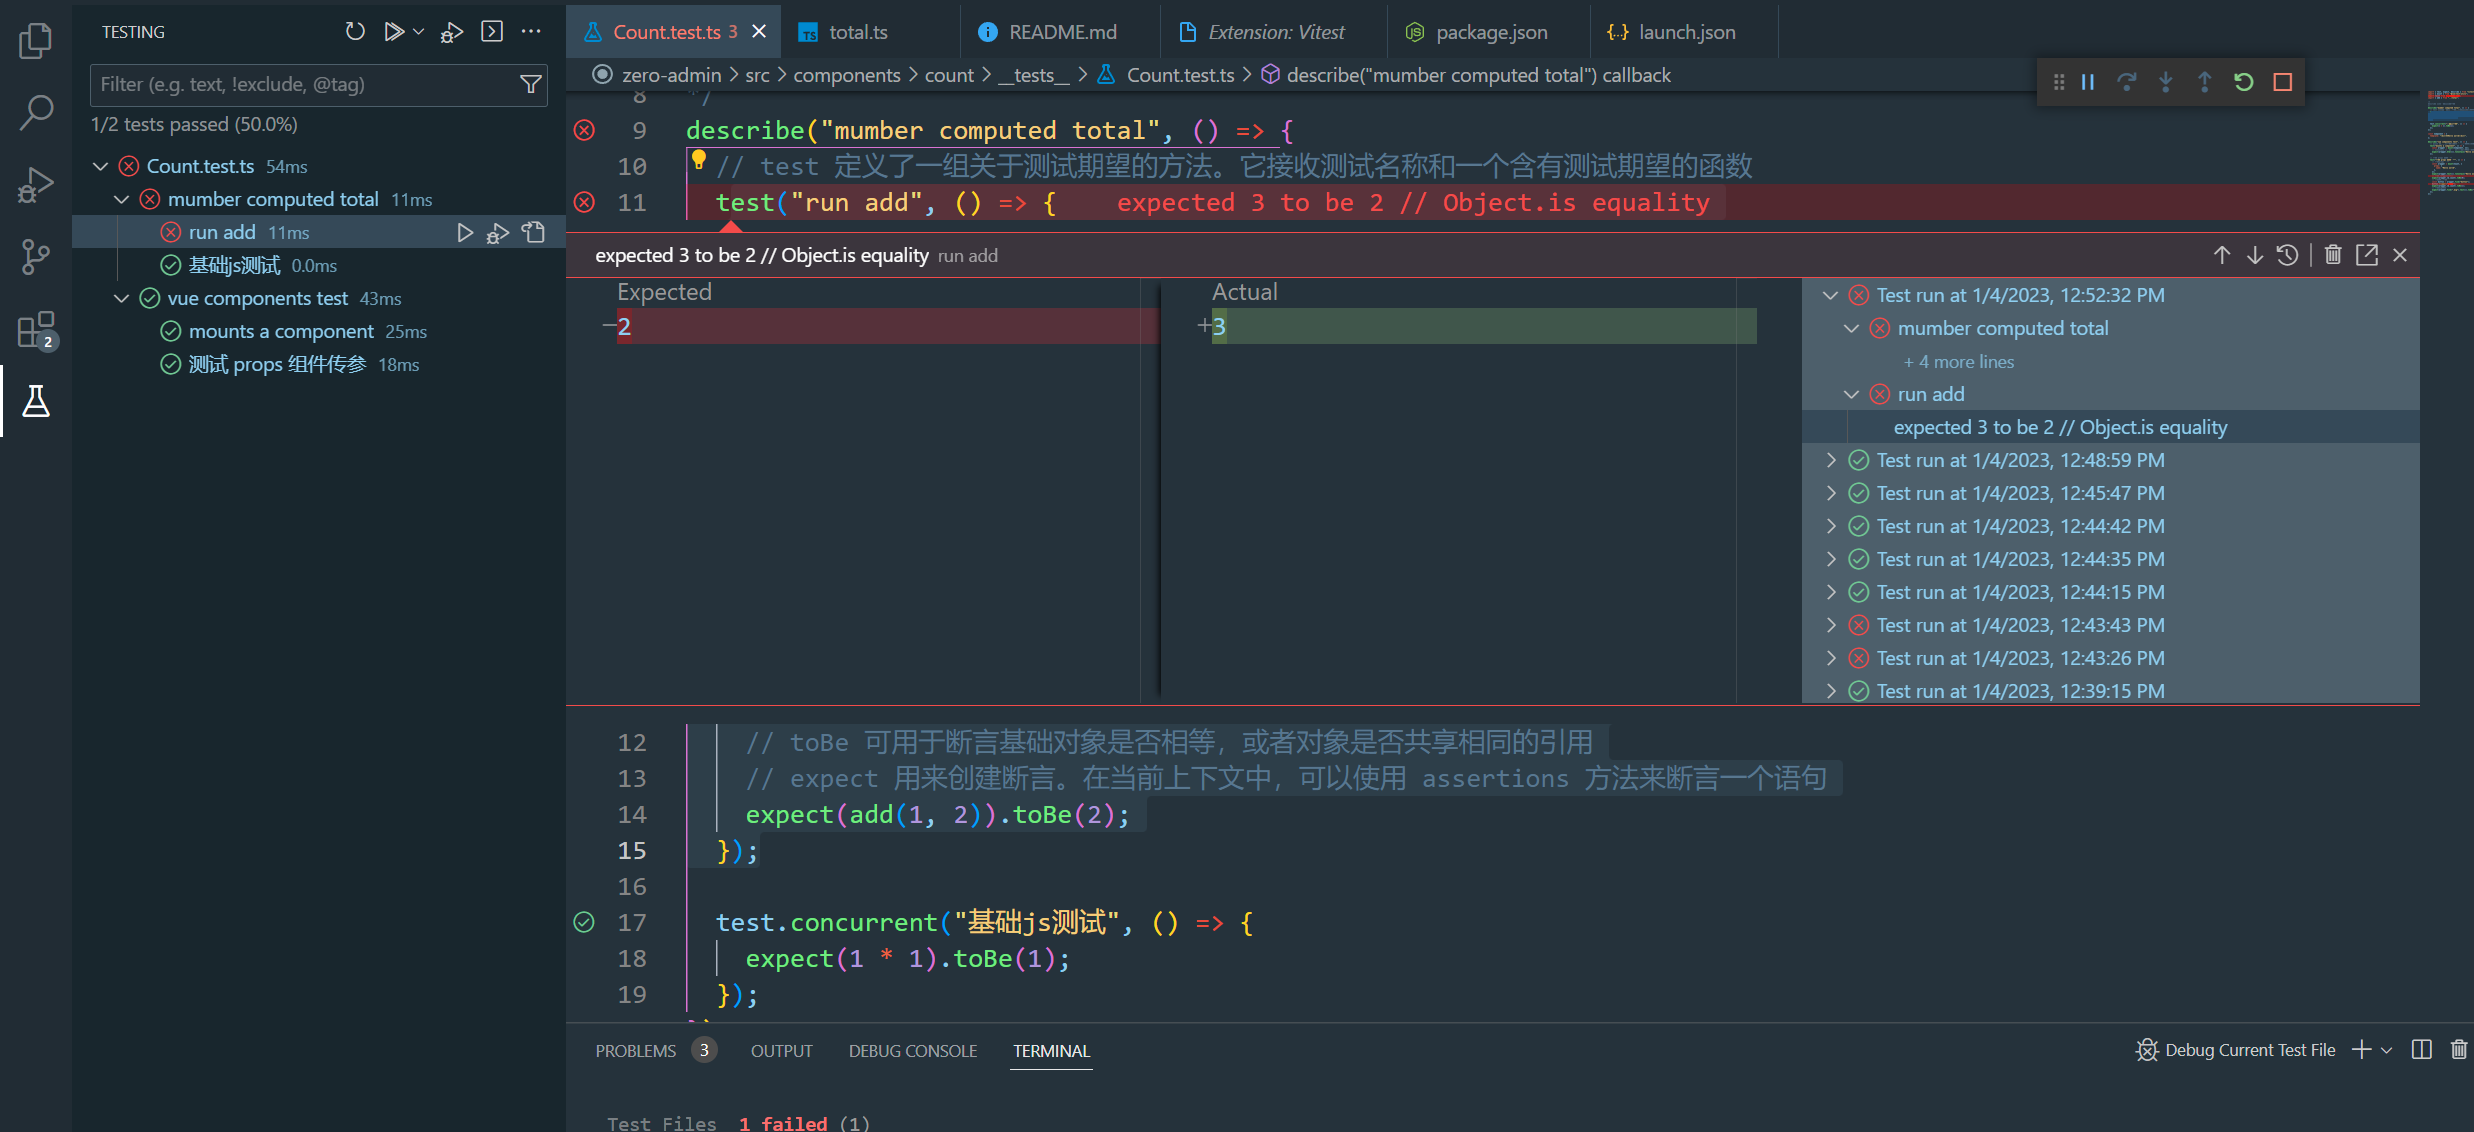
- 编写测试文件
import { test, expect } from "vitest";
import { mount } from "@vue/test-utils";
import Count from "../index.vue";

test.concurrent("基础js测试", () => {
  expect(1 + 1).toBe(2);
});

const Component = {
  template: "<div>44Hello world</div>",
};

// mount 的第二个参数,可以传一些配置项,比如props。这在测试组件时,很好用
test("mounts a component", () => {
  const wrapper = mount(Component, {});

  expect(wrapper.html()).toContain("Hello world");
});

// 测试 props 组件传参
test("测试 props 组件传参", () => {
  // 测试props 传参
  const wrapper = mount(Count, {
    props: {
      name: "Hello world",
    },
  });
  expect(wrapper.text()).toContain("Hello world");
  // 测试 ref指定初始值
  expect(wrapper.vm.count).toBe(0);
  // 测试点击事件
  const button = wrapper.find("button");
  button.trigger("click");
  expect(wrapper.vm.count).toBe(1);
  // 测试msg渲染
  expect(wrapper.find(".msg").text()).toBe("hello");
});
安装 vscode 插件,配置测试 debug 环境
- 插件商店搜索 Vitest 安装
- 点击 debug 选择 node 配置 .vscode 文件夹下 launch.json 文件
{
  // Use IntelliSense to learn about possible attributes.
  // Hover to view descriptions of existing attributes.
  // For more information, visit: https://go.microsoft.com/fwlink/?linkid=830387
  "version": "0.2.0",
  "configurations": [
    {
      "type": "node",
      "request": "launch",
      "name": "Debug Current Test File",
      "autoAttachChildProcesses": true,
      "skipFiles": ["<node_internals>/**", "**/node_modules/**"],
      "program": "${workspaceRoot}/node_modules/vitest/vitest.mjs",
      "args": ["run", "${relativeFile}"],
      "smartStep": true,
      "console": "integratedTerminal"
    }
  ]
}
点击 debug 运行
集成打印插件
- 官网:https://printjs.crabbly.com/#documentation
- 安装
pnpm add print-js
配置 .env
- vite.config.ts 读取
const root = process.cwd();
const env = loadEnv(process.argv[process.argv.length - 1], root);
// 读取值 env.VITE_APP_SERVICE;
- ts 文件读取
import.meta.env.VITE_APP_TITLE
import.meta.glob 批量导入文件夹下文件
function addRouter(list) {
  const modules = import.meta.glob("./views/**.vue");
  for (const path in modules) {
    modules[path]().then((mod) => {
      const file = mod.default;
      if (list.map((a) => a.name).includes(file.name)) {
        router.addRoute({
          path: "/" + file.name,
          name: file.name,
          component: file,
        });
      }
    });
  }
}
解决 vite 首屏加载缓慢问题
参考文章:
- https://blog.csdn.net/m0_67265464/article/details/125345620
- https://segmentfault.com/a/1190000042723516
采用判断是否为生产环境,生产环境打包,自动加载,开发环境全局引入,修改 vite.config.ts 文件
export default ({ command, mode }: ConfigEnv): UserConfig => {
  // 读取环境变量配置
  const root = process.cwd();
  const env = loadEnv(process.argv[process.argv.length - 1], root);
  // 判断是否为打包环境
  const isBuild = command === "build";

  return {
    plugins: [
      vue(),
      vueJsx(),
      // ant design vue 按需加载
      Components({
        resolvers: [
          AntDesignVueResolver({ importStyle: isBuild ? "less" : false }),
        ],
      }),
    ],
  };
};
全局引入在 main.ts 文件中,目前未实现环境变量的判断,如需打包,请手动注释掉全局引入的 ant-design-vue 样式
// 生产环境下,注释掉下面的全局样式引入
import "ant-design-vue/dist/antd.less";
利用 plop,自定义脚手架
Plop 是一个小而美的脚手架工具,它主要用于创建项目中特定类型的文件,Plop 主要集成在项目中使用,帮助我们快速生成一定规范的初始模板文件
- 安装
pnpm add plop -D - 在项目根目录下创建
plopfile.js文件
#!/usr/bin/env node
import componentsSetting from "./plop-templates/components/prompt.js";
import pageSetting from "./plop-templates/pages/prompt.js";

export default function (plop) {
  plop.setWelcomeMessage("请选择需要创建的模式:");
  plop.setGenerator("components", componentsSetting);
  plop.setGenerator("page", pageSetting);
}
在项目根目录下创建
plop-templates文件夹- 新建 components 文件夹,添加文件
prompt.js指令文件和index.hbs模板文件 - prompt.js 指令内容
import fs from "fs"; function getFolder(path) { const components = []; const files = fs.readdirSync(path); files.forEach((item) => { const stat = fs.lstatSync(`${path}/${item}`); if (stat.isDirectory() === true && item !== "components") { components.push(`${path}/${item}`); components.push(...getFolder(`${path}/${item}`)); } }); return components; } const componentsSetting = { description: "创建组件", // 提示数组 prompts: [ { type: "confirm", name: "isGlobal", message: "是否为全局组件", default: false, }, { type: "list", name: "path", message: "请选择组件创建目录", choices: getFolder("src/components"), when: (answers) => { return !answers.isGlobal; }, }, { type: "input", name: "name", message: "请输入组件名称", validate: (v) => { if (!v || v.trim === "") { return "组件名称不能为空"; } else { return true; } }, }, ], // 行为数组 actions: (data) => { let path = ""; if (data.isGlobal) { path = "src/components/{{properCase name}}/index.vue"; } else { path = `${data.path}/components/{{properCase name}}/index.vue`; } const actions = [ { type: "add", path, templateFile: "plop-templates/components/index.hbs", }, ]; return actions; }, }; export default componentsSetting;- index.hbs 模板内容
<template> <div> <!-- 布局 --> </div> </template> <script lang="ts" setup{{#if isGlobal}} name="{{ properCase name }}"{{/if}}> // 逻辑代码 </script> <style lang="scss" scoped> // 样式 </style>- 新建 components 文件夹,添加文件
在项目 package.json 添加
"cli": "plop",命令
"scripts": {
    "cli": "plop",
  },
- 通过
pnpm cli选择创建项目代码模板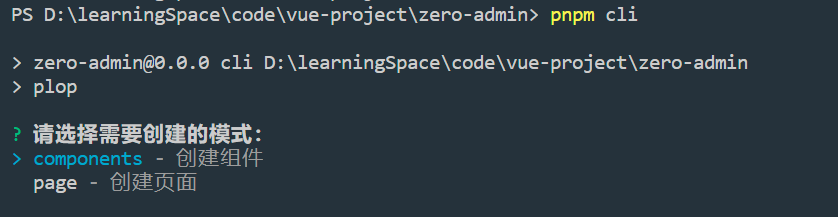
集成 mockjs 模拟后台接口
安装依赖
- pnpm add mockjs
- pnpm add @types/mockjs -D
- pnpm add vite-plugin-mock -D
配置 vite.config.ts 文件
- 引入插件
import { viteMockServe } from "vite-plugin-mock"; - 在 数组中进行配置
export default ({ command, mode }: ConfigEnv): UserConfig => { // 读取环境变量配置 const root = process.cwd(); const env = loadEnv(process.argv[process.argv.length - 1], root); const isBuild = command === "build"; return { plugins: [ //.... viteMockServe({ mockPath: "src/mock", localEnabled: !isBuild, prodEnabled: isBuild, injectCode: ` import { setupProdMockServer } from './mockProdServer'; setupProdMockServer(); `, }), ], }; };- 引入插件
新建 src\mockProdServer.ts 文件与 main.ts 文件同级
import { createProdMockServer } from "vite-plugin-mock/es/createProdMockServer";

const mocks: any[] = [];
const mockContext = import.meta.glob("./mock/*.ts", {
  eager: true,
});
Object.keys(mockContext).forEach((v) => {
  mocks.push(...(mockContext[v] as any).default);
});

export function setupProdMockServer() {
  createProdMockServer(mocks);
}
- 新建 src\mock 文件夹,mock 文件下,新建业务模块 login.ts
export default [
  {
    url: "/api/sys/login", // 模拟登录接口
    method: "POST", // 请求方式
    timeout: 3000, // 超时事件
    statusCode: 200, // 返回的http状态码
    response: (option: any) => {
      // 返回的结果集
      return {
        code: 200,
        message: "登录成功",
        data: {
          failure_time: Math.ceil(new Date().getTime() / 1000) + 24 * 60 * 60,
          account: option.body.account,
          token: "@string",
        },
      };
    },
  },
];
- 利用封装的 api 调用 /api/sys/login 接口
postAction("/sys/login", { userName: userName, password: password }).then(
  (res: any) => {}
);
自定义按钮权限指令
- 在 directive 文件夹下,新建 permission.ts 文件。添加权限指令代码
// 引入vue中定义的指令对应的类型定义
import type { Directive } from "vue";
const permission: Directive = {
  // mounted是指令的一个生命周期
  mounted(el, binding) {
    // value 获取用户使用自定义指令绑定的内容
    const { value } = binding;
    // 获取用户所有的权限按钮
    // const permissionBtn: any = sessionStorage.getItem("permission");
    const permissionBtn: any = ["admin", "dashboard.admin"];
    // 判断用户使用自定义指令,是否使用正确了
    if (value && value instanceof Array && value.length > 0) {
      const permissionFunc = value;
      //判断传递进来的按钮权限,用户是否拥有
      //Array.some(), 数组中有一个结果是true返回true,剩下的元素不会再检测
      const hasPermission = permissionBtn.some((role: any) => {
        return permissionFunc.includes(role);
      });
      // 当用户没有这个按钮权限时,返回false,使用自定义指令的钩子函数,操作dom元素删除该节点
      if (!hasPermission) {
        // el.style.display = "none";
        el.parentNode && el.parentNode.removeChild(el);
      }
    } else {
      throw new Error(`传入关于权限的数组,如 v-permission="['admin','user']"`);
    }
  },
};

export default permission;
- 在 directive 文件夹下,新建 index.ts 批量注册指令
import type { Directive } from "vue";
import permission from "./permission";
// 自定义指令
const directives = { permission };

export default {
  install(app: any) {
    Object.keys(directives).forEach((key) => {
      // Object.keys() 返回一个数组,值是所有可遍历属性的key名
      app.directive(key, (directives as { [key: string]: Directive })[key]); //key是自定义指令名字;后面应该是自定义指令的值,值类型是string
    });
  },
};
- 在 main.ts 文件引入,注册自定义指令
import { createApp } from "vue";
import App from "./App.vue";
import directive from "./directive";

const app = createApp(App);
app.use(directive);

app.mount("#app");
处理 px 转 rem,和 css 自动添加浏览器前缀
- 安装
pnpm add postcss-pxtorem autoprefixer -D - vite.config.ts 配置
import postCssPxToRem from "postcss-pxtorem";
import autoprefixer from "autoprefixer";
export default ({ command, mode }: ConfigEnv): UserConfig => {
  return {
    css: {
      postcss: {
        plugins: [
          postCssPxToRem({
            // 自适应,px>rem转换
            rootValue: 16, // 1rem的大小
            propList: ["*"], // 需要转换的属性,这里选择全部都进行转换
          }),
          autoprefixer({
            // 自动添加前缀
            overrideBrowserslist: [
              "Android 4.1",
              "iOS 7.1",
              "Chrome > 31",
              "ff > 31",
              "ie >= 8",
              //'last 2 versions', // 所有主流浏览器最近2个版本
            ],
            grid: true,
          }),
        ],
      },
    },
  };
};
Monorepo
Monorepo 是一种项目管理方式,就是把多个项目放在一个仓库里面 https://juejin.cn/post/6964328103447363614#heading-1
- 项目根目录新建
pnpm-workspace.yaml文件
packages:
  # all packages in subdirs of packages/ and components/
  - "packages/**"
- 将
@zero-admin/utils安装 到 @zero-admin/chart 执行命令pnpm i @zero-admin/utils -r --filter @zero-admin/chart - 将
@zero-admin/chart安装到根项目 package.json 文件中,执行命令pnpm i @zero-admin/chart -w
图像编辑器
流程图
安装依赖
- 流程图核心包
pnpm add @logicflow/core -w - 流程图扩展包
pnpm add @logicflow/extension -w - 格式化展示 json 数据
pnpm add vue-json-pretty -w
初始化容器及 LogicFlow 对象
准备容器
国际化
- 安装
pnpm add vue-i18n
读取 makdown 文档,编写组件说明文档
- 安装依赖 pnpm add @kangc/v-md-editor@next -D pnpm add prismjs -S pnpm add @types/prismjs -D
- 在 setting 文件夹下新建 mdEditor.ts 文件
import VueMarkdownEditor from "@kangc/v-md-editor";
import "@kangc/v-md-editor/lib/style/base-editor.css";
import vuepressTheme from "@kangc/v-md-editor/lib/theme/vuepress.js";
import "@kangc/v-md-editor/lib/theme/style/vuepress.css";

import Prism from "prismjs";

VueMarkdownEditor.use(vuepressTheme, {
  Prism,
});
export default VueMarkdownEditor;
- 在 main.ts 文件中引入挂载
import { createApp } from "vue";
import App from "./App.vue";

import VueMarkdownEditor from "@/setting/mdEditor";
const app = createApp(App);

app.use(VueMarkdownEditor);
app.mount("#app");
- 在组件中使用
<template>
  <v-md-editor
    v-model="markdownTable"
    height="calc(100vh - 293px)"
    mode="preview"
  ></v-md-editor>
</template>
<script setup lang="ts">
  import markdownTable from "./README.md?raw";
</script>
将资源引入为字符串:资源可以使用 ?raw 后缀声明作为字符串引入 官网:https://ckang1229.gitee.io/vue-markdown-editor/zh/
maptalks + threejs demo 示例
- 项目依赖
pnpm add three maptalks maptalks.three --save - Demo 源码文件:文件路径:
src\views\charts\smartCity.vue - 访问 Demo
- 启动项目
pnpm dev - 浏览器访问路径
http://localhost:3030/city
- 启动项目
使用 commitizen 规范 git 提交
安装依赖
pnpm install commitizen @commitlint/config-conventional @commitlint/cli commitlint-config-cz cz-git -D配置 package.json
{
  ...
  "scripts": {
    "git:comment": "引导设置规范化的提交信息",
    "git": "git pull && git add . && git-cz && git push",
  },

  "husky": {
    "hooks": {
      "pre-commit": "lint-staged",
      "commit-msg": "commitlint -E HUSKY_GIT_PARAMS"
    }
  },
  "lint-staged": {
    "src/**/*.{js,ts,vue}": [
      "prettier --write --ignore-unknown --no-error-on-unmatched-pattern",
      "eslint . --ext .vue,.js,.jsx,.cjs,.mjs,.ts,.tsx,.cts,.mts --fix --ignore-path .gitignore"
    ],
    "package.json": [
      "prettier --write"
    ]
  },
  "config": {
    "commitizen": {
      "path": "node_modules/cz-git"
    }
  }
  ...
}
- 项目根目录新建 commitlint.config.js 添加配置
module.exports = {
  // 继承的规则
  extends: ["@commitlint/config-conventional", "cz"],
  // 定义规则类型
  rules: {
    // type 类型定义,表示 git 提交的 type 必须在以下类型范围内
    "type-enum": [
      2,
      "always",
      [
        "feature", // 新功能(feature)
        "bug", // 此项特别针对bug号,用于向测试反馈bug列表的bug修改情况
        "fix", // 修补bug
        "ui", // 更新 ui
        "docs", // 文档(documentation)
        "style", // 格式(不影响代码运行的变动)
        "perf", // 性能优化
        "release", // 发布
        "deploy", // 部署
        "refactor", // 重构(即不是新增功能,也不是修改bug的代码变动)
        "test", // 增加测试
        "chore", // 构建过程或辅助工具的变动
        "revert", // feat(pencil): add ‘graphiteWidth’ option (撤销之前的commit)
        "merge", // 合并分支, 例如: merge(前端页面): feature-xxxx修改线程地址
        "build", // 打包
      ],
    ],
    // <type> 格式 小写
    "type-case": [2, "always", "lower-case"],
    // <type> 不能为空
    "type-empty": [2, "never"],
    // <scope> 范围不能为空
    "scope-empty": [2, "never"],
    // <scope> 范围格式
    "scope-case": [0],
    // <subject> 主要 message 不能为空
    "subject-empty": [2, "never"],
    // <subject> 以什么为结束标志,禁用
    "subject-full-stop": [0, "never"],
    // <subject> 格式,禁用
    "subject-case": [0, "never"],
    // <body> 以空行开头
    "body-leading-blank": [1, "always"],
    "header-max-length": [0, "always", 72],
  },
  prompt: {
    alias: { fd: "docs: fix typos" },
    messages: {
      type: "选择你要提交的类型 :",
      scope: "选择一个提交范围(可选):",
      customScope: "请输入自定义的提交范围 :",
      subject: "填写简短精炼的变更描述 :\n",
      body: '填写更加详细的变更描述(可选)。使用 "|" 换行 :\n',
      breaking: '列举非兼容性重大的变更(可选)。使用 "|" 换行 :\n',
      footerPrefixesSelect: "选择关联issue前缀(可选):",
      customFooterPrefix: "输入自定义issue前缀 :",
      footer: "列举关联issue (可选) 例如: #31, #I3244 :\n",
      confirmCommit: "是否提交或修改commit ?(y/n/e/h)",
    },
    types: [
      { value: "feat", name: "feat:     新增功能 | A new feature" },
      { value: "fix", name: "fix:      修复缺陷 | A bug fix" },
      {
        value: "docs",
        name: "docs:     文档更新 | Documentation only changes",
      },
      {
        value: "style",
        name: "style:    代码格式 | Changes that do not affect the meaning of the code",
      },
      {
        value: "refactor",
        name: "refactor: 代码重构 | A code change that neither fixes a bug nor adds a feature",
      },
      {
        value: "perf",
        name: "perf:     性能提升 | A code change that improves performance",
      },
      {
        value: "test",
        name: "test:     测试相关 | Adding missing tests or correcting existing tests",
      },
      {
        value: "build",
        name: "build:    构建相关 | Changes that affect the build system or external dependencies",
      },
      {
        value: "ci",
        name: "ci:       持续集成 | Changes to our CI configuration files and scripts",
      },
      { value: "revert", name: "revert:   回退代码 | Revert to a commit" },
      {
        value: "chore",
        name: "chore:    其他修改 | Other changes that do not modify src or test files",
      },
    ],
    allowCustomScopes: true,
    skipQuestions: ["body", "footer"],
  },
};
Git hooks 工具
vue3 使用 husky + commitlint 强制码提交规范
- 安装依赖
pnpm add lint-staged husky -D -w - 添加package.json 脚本
"prepare": "husky install"
- 初始化husky将 git hooks钩子交由husky执行
pnpm run prepare - npx husky add .husky/pre-commit "pnpm run eslint"
- pnpm husky add .husky/commit-msg 'pnpm commitlint --edit $1'
git 使用命令
克隆远程仓库代码
git clone https://gitee.com/zmmlet/zero-admin.git第 1 步:同步远程仓库代码:
git pullgit add/git commit代码之前首先git pull,需先从服务器上面拉取代码,以防覆盖别人代码;如果有冲突,先备份自己的代码,git checkout下远程库里最新的的代码,将自己的代码合并进去,然后再提交代码。第 2 步:查看当前状态:
git status使用git status来查看当前状态,红色的字体显示的就是你修改的文件第 3 步:提交代码到本地
git缓存区:git add情形一:如果你git status查看了当前状态发现都是你修改过的文件,都要提交,那么你可以直接使用git add .就可以把你的内容全部添加到本地 git 缓存区中 情形二:如果你git status查看了当前状态发现有部分文件你不想提交,那么就使用git add xxx(上图中的红色文字的文件链接) 就可以提交部分文件到本地 git 缓存区。第 4 步:推送代码到本地
git库:git commitgit commit -m"提交代码" 推送修改到本地 git 库中第 5 步:提交本地代码到远程仓库:
git pushgit push<远程主机名> <远程分支名> 把当前提交到git本地仓库的代码推送到远程主机的某个远程分之上